Copyright © 2003, 2004 Simtec Electronics
| Revision History | ||||
|---|---|---|---|---|
| Revision 1.00 | 24th January 2003 | VRS | ||
|
Initial release. | ||||
| Revision 1.40 | 3rd February 2003 | VRS | ||
|
Updated user guide. | ||||
| Revision 1.55 | 25th April 2003 | VRS | ||
|
Updated user guide. | ||||
| Revision 1.73 | 17th September 2003 | VRS | ||
|
Updated user guide. | ||||
| Revision 1.80 | 18th November 2003 | VRS | ||
|
Updated user guide. | ||||
| Revision 1.95 | 10th March 2004 | VRS | ||
|
Updated user guide. | ||||
| Revision 2.01 | 12th October 2004 | VRS | ||
|
Updated user guide. | ||||
| Revision 2.08 | 13th April 2005 | VRS | ||
| ||||
| Revision 2.20 | 20th Febuary 2006 | |||
|
Updated user guide | ||||
Table of Contents
- ABLE User Guide
- Preface
- I. Usage
- 1. Overview
- 2. Getting Started
- 3. Command Line Interface
- 4. Setting Options
- 5. ABLE Console
- 6. Starting an Operating System Manually
- 7. Starting an Operating System Automatically
- 8. Networking
- 9. Upgrading
- II. Command Reference
- I. Core Commands
- autoboot — Attempt to locate and boot suitable images automatically.
- console — Controls ABLE console.
- date — Show the current real time clock date and time.
- devls — Lists information about devices attached to a system
- display — Display and image on console.
- help — Display help on built in commands
- history — Lists the commands in the command line history.
- hwinfo — Print hardware information.
- man — Manual page display
- meminfo — Shows memory information.
- modules — List ABLE modules
- pmu — Power management control
- reset — Reset machine
- sbcd — Manipulates the board configuration data.
- setdate — Sets the date in the real time clock
- setopt — Sets device options.
- settime — Sets the real time clock
- shadow — Moves ABLE into RAM
- showhz — Shows how long a system has been running
- sysmsg — Show system messages.
- sysspeed — Sets the system clockspeed
- tasks — Displays task threads currently running on system.
- uname — Print system identification
- version — Display ABLE shell version
- wrout — Write a string to an output file.
- II. Shell Commands
- III. Network operations
- IV. File Navigation
- V. File manipulation commands
- VI. Non-volatile settings
- VII. OS manipulation commands
- VIII. Debugging commands
- bast-at — Perform an audio test.
- bast-at2 — Perform BAST audio test copies the line in to the line out
- bast-hdlcd — Manipulate an HD44780 attached to the EB2410ITX LCD Module port.
- dmcfg-rd — Debug command to read Davicom EEPROM
- dmcfg-wr — Debug command to write Davicom EEPROM
- dump — Displays an area of memory in hex dump
- memset — Set range of memory to a specific value.
- peek — Examine memory location
- pic-rd — Read a value to the PMU PIC
- pic-wr — Write a value to the PMU PIC
- poke — Poke memory location
- tick — Check system timing.
- vtp1 — Video test pattern
- vtp2 — Video test pattern
- vtp3 — Video test pattern
- vtp4 — Video test pattern
- vtp5 — Video test pattern
- III. Non-Volatile Variables Reference
- boot.auto — Enable auto boot
- boot.cmd — Command line to use for auto boot
- boot.timeout — Time to wait before auto boot
- boot.fs — The filesystems to be scanned by the autoboot command.
- console.write — Default Console output stream
- console.read — Default Console input stream
- console.level — Console logging level
- fb.enable — Framebuffer driver - enable output
- fb.output — Framebuffer driver - output target
- fb.x — Framebuffer driver - Display X size (width)
- fb.y — Framebuffer driver - Display Y size (height)
- fb.refresh — Framebuffer driver - Display refresh frequency
- ide.multi-limit — IDE multiple sector read limit
- shell.hist — Shell history depth
- sys.autoshadow — Determines if ABLE will automatically moved into RAM at system start
- sys.speed — System speed set at start time
- usb.enable — USB system enable
- usb.hubdepth — USB system depth hubs should be searched for devices to
- IV. Appendices
- Index
- ABLE FIS User Guide
- ABLE batty user guide
Simtec Electronics
Copyright © 2003, 2004, 2005, 2006 Simtec Electronics
2006
Table of Contents
- Preface
- I. Usage
- 1. Overview
- 2. Getting Started
- 3. Command Line Interface
- 4. Setting Options
- 5. ABLE Console
- 6. Starting an Operating System Manually
- 7. Starting an Operating System Automatically
- 8. Networking
- 9. Upgrading
- II. Command Reference
- I. Core Commands
- autoboot — Attempt to locate and boot suitable images automatically.
- console — Controls ABLE console.
- date — Show the current real time clock date and time.
- devls — Lists information about devices attached to a system
- display — Display and image on console.
- help — Display help on built in commands
- history — Lists the commands in the command line history.
- hwinfo — Print hardware information.
- man — Manual page display
- meminfo — Shows memory information.
- modules — List ABLE modules
- pmu — Power management control
- reset — Reset machine
- sbcd — Manipulates the board configuration data.
- setdate — Sets the date in the real time clock
- setopt — Sets device options.
- settime — Sets the real time clock
- shadow — Moves ABLE into RAM
- showhz — Shows how long a system has been running
- sysmsg — Show system messages.
- sysspeed — Sets the system clockspeed
- tasks — Displays task threads currently running on system.
- uname — Print system identification
- version — Display ABLE shell version
- wrout — Write a string to an output file.
- II. Shell Commands
- III. Network operations
- IV. File Navigation
- V. File manipulation commands
- VI. Non-volatile settings
- VII. OS manipulation commands
- VIII. Debugging commands
- bast-at — Perform an audio test.
- bast-at2 — Perform BAST audio test copies the line in to the line out
- bast-hdlcd — Manipulate an HD44780 attached to the EB2410ITX LCD Module port.
- dmcfg-rd — Debug command to read Davicom EEPROM
- dmcfg-wr — Debug command to write Davicom EEPROM
- dump — Displays an area of memory in hex dump
- memset — Set range of memory to a specific value.
- peek — Examine memory location
- pic-rd — Read a value to the PMU PIC
- pic-wr — Write a value to the PMU PIC
- poke — Poke memory location
- tick — Check system timing.
- vtp1 — Video test pattern
- vtp2 — Video test pattern
- vtp3 — Video test pattern
- vtp4 — Video test pattern
- vtp5 — Video test pattern
- III. Non-Volatile Variables Reference
- boot.auto — Enable auto boot
- boot.cmd — Command line to use for auto boot
- boot.timeout — Time to wait before auto boot
- boot.fs — The filesystems to be scanned by the autoboot command.
- console.write — Default Console output stream
- console.read — Default Console input stream
- console.level — Console logging level
- fb.enable — Framebuffer driver - enable output
- fb.output — Framebuffer driver - output target
- fb.x — Framebuffer driver - Display X size (width)
- fb.y — Framebuffer driver - Display Y size (height)
- fb.refresh — Framebuffer driver - Display refresh frequency
- ide.multi-limit — IDE multiple sector read limit
- shell.hist — Shell history depth
- sys.autoshadow — Determines if ABLE will automatically moved into RAM at system start
- sys.speed — System speed set at start time
- usb.enable — USB system enable
- usb.hubdepth — USB system depth hubs should be searched for devices to
- IV. Appendices
- Index
List of Figures
- 2.1. Hyperterm settings window
- 2.2. Hyperterm displaying ABLE output
- 2.3. Minicom settings window
- 6.1. Outline of Motorola S-Record
- 7.1. Initial boot operations
- 9.1. EB2410ITX resources page
- 7. Autoboot command flowchart
- 8. Video test pattern 1
- 9. Video test pattern 2
- 10. Video test pattern 3
- 11. Video test pattern 4
- 12. Video test pattern 5
List of Tables
List of Examples
- 2.1. Display after starting ABLE on EB2410ITX
- 3.1. Using the test command and conditional operators
- 3.2. Using curly braces to disambiguate variables
- 3.3. Accessing positional parameters
- 3.4. Navigating a filesystem
- 3.5. Getting help on the uname command
- 3.6. Example shell script
- 4.1. Using the nvshow command to list the default variables
- 4.2. Using the nvset command
- 5.1. Using the console command to show available drivers
- 5.2. Setting serial console driver parameters
- 5.3. Showing the consoles of an unconfigured system
- 5.4. Adding console drivers to a running system
- 5.5. Setup of basic serial console
- 5.6. Using the null drivers safely
- 5.7. A method to display logo and boot abort
- 6.1. Using the ls command to list available sources.
- 6.2. Using the ls command to list cooked sources
- 6.3. Using the tftpboot source
- 6.4. Using the XModem source
- 6.5. An example S-Record
- 6.6. Using the "setargs, load and boot" method to start a LINUX® kernel
- 6.7. Using the "command line" method to start a LINUX® kernel
- 7.1. Displaying a logo during the automatic boot process
- 8.1. Executing a program using the tftpboot pseudo filesystem
- 9.1. The romwrite command requiring the shadow command
- 9.2. The romwrite command producing warnings
- 9.3. The romwrite command completing successfully
- 29. Using the console command
- 30. Using the date command
- 31. Using the devls command
- 32. Using the display command
- 33. Using the help command
- 34. Using the history command
- 35. Using the hwinfo command
- 36. Using the man command
- 37. Using the meminfo command
- 38. Using the modules command
- 39. Using the setdate command to set the real time clock
- 40. Using the setopt command to alter serial port options.
- 41. Using the settime command to set the real time clock
- 42. Using the showhz command
- 43. Displaying the system messages after a default boot
- 44. Using the syspeed command on a EB2410ITX
- 45. Using the tasks command
- 46. Using the uname command on the EB2410ITX
- 47. Using the version command
- 48. Using the echo command
- 49. Using the read command
- 50. Subshell variable scope
- 51. Using the sleep command to delay execution
- 52. Performing assorted tests
- 53. Using the ifconfig command to select default interface
- 54. Using the ifconfig command to configure a fixed address
- 55. Using the mii command to show all the registers in a phy
- 56. Using the cd and ls commands to navigate a filesystem
- 57. Using the ls command
- 58. Using the lsfs command
- 59. Using the pwd command and
PWDvariable to show the present working directory - 60. Using cat command to display files contents
- 61. Using the dumpfile command
- 62. Using the file command to determine filetypes
- 63. Checksumming a file with the sum command
- 64. Using the nvset command and shell method to alter a non-volatile variables
- 65. Using the nvshow command
- 66. Using the boot command
- 67. Using the showargs command
- 68. Using the setargs command
- 69. Using the dump command to examine memory
About this document. This document describes the Simtec Electronics Advanced Boot Load Environment (ABLE) which provides a flexible environment for both experimentation and integrator solutions.
Intended Audience. This document is aimed at anyone using the ABLE bootloader. The first part is more useful to the beginner but the reference parts allow the book to remain useful to the more experienced user.
Chapter Summary.
- Chapter 1, Overview
Gives an outline of what functions ABLE does and does not provide and a brief discussion of possible features.
- Chapter 2, Getting Started
Gives an introduction to the facilities of ABLE and methods for interacting with the bootloader.
- Chapter 3, Command Line Interface
Gives a comprehensive guide to using the in built command line interface.
- Chapter 4, Setting Options
Provides a guide to the use of non volatile ram settings.
- Chapter 5, ABLE Console
Shows how ABLE communicates with the user and how that is controlled.
- Chapter 6, Starting an Operating System Manually
Shows how Operating systems may be started manually.
- Chapter 7, Starting an Operating System Automatically
Shows how the automatic boot process operates.
- Chapter 8, Networking
Gives details on how to configure network interfaces from ABLE
- Chapter 9, Upgrading
Gives details on how to upgrade the bootloader.
- Part II, “Command Reference”
Is a complete reference to all the built in commands within ABLE.
- Part III, “Non-Volatile Variables Reference”
Is a complete reference to all the non volatile variables available within ABLE.
Acknowledgements. Several people contributed to the creation of this book in various ways. I would especially like to thank R. Parry and M Gillard for proofreading.
Feedback. Any suggestions, comments or corrections concerning this document are welcomed, please contact Simtec Electronics giving:
| The document title |
| The document revision |
| A clear explanation of your comments and how they apply |
Table of Contents
- 1. Overview
- 2. Getting Started
- 3. Command Line Interface
- 4. Setting Options
- 5. ABLE Console
- 6. Starting an Operating System Manually
- 7. Starting an Operating System Automatically
- 8. Networking
- 9. Upgrading
The Simtec Electronics Advanced Boot Load Environment (ABLE) is a portable modular boot loader for use in applications where an Operating System (OS) must be retrieved and started. ABLE provides extended functionality providing modules for a command line, video consoles, serial consoles, network booting and numerous other facilities.
ABLE is a powerful tool and provides a flexible environment useful for both the development and deployment of systems. ABLE is a boot loader, not an Operating System, this distinction can sometimes lead to misunderstandings about the capabilities provided by ABLE. A boot loader in this context is a self contained program which retrieves and starts execution of an Operating System it does not execute user programs itself (all the CLI commands are built in) and does not provide services to an Operating System once started (PC BIOS perform this role).
The modular nature of ABLE allows the use of the same building blocks for every supported platform. The integration and omission of various modules allow for specific driver sets depending on the peripherals of a platform. The flexibility of this approach allows for a common familiar environment across all supported platforms while still supporting a complete feature set.
This user guide covers the operation of ABLE from its command line interface (CLI). For details on the programming interface and more advanced topics please see the ABLE Reference manual or contact Simtec Electronics support directly.
ABLE is typically provided in any board directly manufactured by Simtec Electronics. Customer applications which are not manufactured by Simtec Electronics may still use ABLE once a suitable binary distribution licence is obtained.
When a platform is initially powered or a hard reset performed, the ABLE environment will be started, each component module will be loaded in turn. The last module loaded is the ABLE shell which will present the user with a command line interface.
ABLE has a flexible console system for its input and output
which can be configured to meet most requirements. The console
system is controlled with console command and the
console.read and
console.write parameters.
Details on using the console system can be found in Chapter 5, ABLE Console
The default console operation is to use all suitable input and output devices available.
On the EB2410ITX both the first serial port and the video display will be used for output and the serial port and USB keyboard for input.
In general use the console is used to interact with the ABLE Command Line Interface. This command line interface is generally assumed for most interactions with ABLE
Example 2.1. Display after starting ABLE on EB2410ITX
This example shows the typical default output shown when ABLE is started.
selected all-wr for console write
selected all-rd for console read
DRAM: 128 Mb (134217728 bytes)
BAST: PMU version 1.02, ID 00:01:3d:00:01:6a
ABLE 2.20 Copyright 2001-2005,2006 Simtec Electronics
hdb: ATAPI CDROM: TOSHIBA CD-ROM XM-7002B PIO mode 4
hdc: FUJITSU MHF2043AT: ATA PIO mode 4
hdc:Diagnosing disc drive: ok
(hdc) 4GB
(hd0) on ((hdc1):ext2)
(hdb) Drive Empty
DM9000: dm0: r1, 00:01:3d:00:01:6a int phy, link ok, 100Mbit full duplex
NE2000: ne0: ISA/Generic, 00:01:3d:00:01:6b
TMP101: not detected
sys.autoshadow unset, automatically shadowing
>
Unless the boot parameters are altered from their default settings the automatic boot process will commence. To manually start an operating system the command line must be used.
To access the serial console from windows the Hyperterm program can be used. Identify which serial port the platform is connected to and ensure a note is made of the correct COM port, e.g. COM1 or COM2.
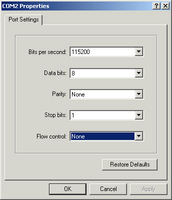
Start HyperTerm and create a new connection. When prompted for which modem to use, instead choose the appropriate COM port, as noted earlier. Then the appropriate settings for your platform (please refer to platform specific documentation) typically these settings are 115200 bits per second, 8 data bits, no parity, 1 stop bit and no flow control.

Once the connection is established the output from ABLE should be seen in the Hyperterm window
To access the serial console from LINUX® the minicom program can be used. Identify which serial port the EB675001DIP is connected to and ensure a note is made of the correct device node, e.g. something like /dev/ttyS0 or /dev/ttyUSB0.
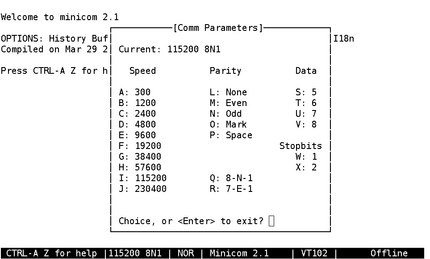
Start minicom and ensure the correct settings are selected (Default is Ctrl-A p). These settings are 115200 baud, 8 data bits, no parity and 1 stop bit. Obviously minicom should be using the correct serial port as noted earlier.
Table of Contents
The ABLE command line interface (CLI) provides the primary method for interacting with ABLE. The command line is sometimes referred to by the UNIX® naming as a shell. The ABLE shell is a very basic UNIX® bourne shell and should be familiar to anyone experienced with that environment.
The CLI is a flexible environment and commands can be placed in a script file for automation purposes. All the current commands are documented in Part II, “Command Reference”.
The default prompt is “>”, this can be
altered by setting the value of the PS1
shell variable. Commands can be entered at the prompt and
executed by pressing return.
If an error is made while typing a command the left and right arrow keys can be used to position the cursor and insert or delete characters.
Once a command has been executed it may be recalled by using the up arrow, indeed several commands are stored in the command history to a depth determined by the shell.hist parameter. By using the up and down arrow keys the desired line in the history may be selected. The command may then optionally be edited and then executed by pressing return.
Depending on the terminal in use some standard control characters can be used, for example Control U to clear a line.
The shell processes commands as a series of tokens separated by unquoted space, tab, ||, && and ; characters. The first token specifies the command to be executed and is passed as the first argument, all the remaining tokens are passed as parameters to the command.
Each command exits with a status, this status is represented by a number between 0 and 255. A command which exits with a status of 0 has succeeded any other value is taken to indicate a failure.
The shell itself will return the status of the last command it executed or the value specified if using the exit command.
Multiple commands can be placed on a single line each command separated with a conditional operator which controls execution of subsequent commands
Commands may be separated with one of three conditional operators:
The first ; is not really a conditional, each command will be executed despite the exit code of the previous command.
The second && will only execute the next command if the previous one exited with a non zero exit code.
The third || will only execute the second command if the first command exits with a zero exit code.
With these constructs simple conditional decision processes can be built.
The test command can be used to test logical expressions and combined with the conditional operators make decisions based upon a variety of tests.
Example 3.1. Using the test command and conditional operators
This example shows how to use the test command to perform some simple textural and numeric comparisons. The full range of comparisons available can be found in Table 8, “Possible test expressions”
>[ 1 -lt 2 ] && echo "1 < 2"
1 < 2
>[ 2 -lt 1 ] && echo "2 < 1"
>[ 1 -gt 2 ] && echo "1 > 2"
>[ 2 -gt 1 ] && echo "2 > 1"
2 > 1
>[ "text" = "text" ] && echo "true"
true
>[ "text" != "text" ] || echo "true"
true
>[ "text" == "foo" ] && echo "true" || echo "false"
false
>[ "text" != "foo" ] && echo "true" || echo "false"
true
>foo="bar" ; [ -z ${foo} ] && echo "true" ||echo  "false"
false
>foo="" ; [ -z ${foo} ] && echo "true" ||echo  "false"
true
>Some characters and words have special meanings to the shell. The quoting process is used to remove these special properties.
There are three ways to quote special values
The escape character (\)
Single quotation marks (')
Double quotation marks (")
The escape character, a backslash \, causes the shell to ignore the special properties of the following character.
Single quotes around characters stop any special meanings. Strings escaped with single quotes may not contain a single quote because the escape character has no effect within single quotes.
Double quotes preserve all characters within them except $, ' and \. The escape character only works for a limited number of characters within double quotes, these are $, ', " and \.
The ABLE shell supports simple variables, these variables are in the form:
name= [value]
where the name must start with a letter
of the alphabet (upper or lower case) or an underscore
(_) and continue with letters of the
alphabet, numbers or an underscore (_). The
value may contain any arbitrary numeric or
textural value and when omitted is a null (empty) string. The
value may need to be quoted in order to get a
correct assignment.
The non-volatile variables are also accessible from within the shell. The variable form is identical to that of simple variables with one exception, the body of the variable name will contain a full stop (.).
The value is interpreted in the same way as if passed to
the nvset
command. Options that take boolean values can be set with
“on” and “off” (“true”
or “false” and “0” or
“1” may also be used). Other options typically
take free form text, as with simple variables the
value may need to be quoted to get a correct
assignment.
Any changes to the non-volatile variables will not be made permanent until a nvsave command is issued. Chapter 4, Setting Options contains details on using the non-volatile settings.
The positional parameters are similar to the simple variables except the variable name is a positive integer number. Each parameter is set from the arguments to the shell or script when it was started.
The single digit 0 has special meaning and is set to the name of the shell or script.
Positional parameters cannot be assigned with the normal assignment operator and are read only.
When the tenth or later positional parameters are referenced they must be disambiguated using curly braces this is shown fully in Example 3.3, “Accessing positional parameters”
In addition to simple variables there are a small number of “special” variables which do not match the syntax for simple variable names. These typically access specific information within the shell and are read only.
Table 3.1. Special variables
| Variable name | Value |
|---|---|
| ? | Exit status of last command |
| - | Shell parameters |
| * | All the positional parameters separated by the first character of the IFS variable. |
| # | The number of positional parameters. |
Variables are accessed within the shell by using the
dollar symbol followed by the variable name
$name. The variable name my also be
surrounded by curly braces ${name}.
The curly brace form is less ambiguous because if the braces are omitted the shell may not be able to distinguish between a variable name and the text surrounding it. The curly brace form is unambiguous as the variable name is clearly delimited.
Example 3.2. Using curly braces to disambiguate variables
This example shows a variable
myvariable being set and then displayed
using the two forms showing the ambiguity problem.
>myvariable=hello
>echo foo $myvariable bar
foo hello bar
>echo foo$myvariablebar
foo
>echo foo${myvariable}bar
foohellobar
>
Special care must be taken of positional parameters, the simple version with no braces is limited to the nine single digits 1-9 to access the the later positional parameters curly braces must be used.
Example 3.3. Accessing positional parameters
This example shows accessing the first positional parameter, then the first positional parameter when the tenth was meant and finally accessing the tenth parameter correctly.
>echo $1
one
>echo $10
one0
>echo ${10}
ten
>There are a small number of shell variables which have special meaning to the shell environment itself. These variables generally affect some aspect of the shell environment. Several of these variables have defaults which are assigned by the shell upon initialisation.
Table 3.2. Variables with special meanings
| Variable | Meaning |
|---|---|
PS1 | This variable contains the text of the prompt to use, which allows users to alter their prompt or scripts to use the same prompt as the shell. This value is set to > by default. |
PS4 | This variable is the forth level prompt, it is used when the -x switch is in operation to preface output lines. This value is set to + by default. |
PWD | This variable is the present working directory
within the filesystem. Consult Section 3.6, “Filesystem navigation”
for more details. This
value is set to / by
default. |
OLDPWD | The previous working directory. Consult Section 3.6, “Filesystem navigation” for more details. |
IFS | The Internal Field Separator that is used for word splitting after expansion and to split lines into words with the read command. This value is set to “space tab newline” by default. |
ABLE has the ability to fully navigate detected filesystems. The File Navigation commands may be used to move around and list the entries within any filesystem which supports directory enumeration (currently only the tftpboot pseudo filesystem does not). It should be noted that only devices with a valid filesystem recognised and supported by ABLE can be navigated in this way.
ABLE presents all available filesystems and devices in a hierarchical structure. The root of this filesystem is a virtual representation of all the available devices. The devices are either direct representations of devices or aliases which show the detected filesystems on devices.
At initial boot time the Present Working Directory
(PWD) is set to / which represents the root of
the filesystems. The PWD is changed with the
cd command and
displayed with the pwd command. The ls command without any
parameters lists the PWD. With a parameter it
lists the specified directory. The lsfs command is exactly the same
as using ls /.
Example 3.4. Navigating a filesystem
>pwd
/
>ls
(hd1) (aliases to hdc2)
(hd0) (aliases to (hdc1):ext2)
(nvram0) (aliases to 24cxx)
(flash1) (aliases to (nand0p2):jffs2)
(flash0) (aliases to nand0p1)
>cd (hd0)
>ls
lost+found
var
etc
usr
bin
boot
dev
home
lib
mnt
proc
root
sbin
tmp
sys
srv
opt
floppy
cdrom
media
initrd
vmlinuz
>cd boot
>ls -l
-rw-r--r--    1 0 0   376034 System.map-2.4.25-bast
-rw-r--r--    1 0 0    28687 config-2.4.25-bast
-rw-r--r--    1 0 0  1016944 vmlinuz-2.4.25-bast
-rw-r--r--    1 0 0       45 patches-2.4.25-bast
-rwxr-xr-x    1 0 0  1484512 vmlinuz-2.6.11-bast
-rw-r--r--    1 0 0   533056 System.map-2.6.11-bast
>
The ABLE command line has a useful help system available, the help command gives a list of all known commands, some commands have a --help parameter which is another way to obtain the help text.
Example 3.5. Getting help on the uname command
>help
Internal commands are:
sh           autoboot     sbcd         bast-hdlcd   pic-wr       pic-rd
bast-at2     bast-at      dmcfg-rd     dmcfg-wr     pmu          shadow
mii          ifconfig     [            test         console      display
file         hwinfo       wrout        version      nvclear      nvunset
nvsave       nvshow       nvset        uname        sum          tasks
sleep        showhz       sysmsg       setopt       showargs     setargs
reset        memset       meminfo      peek         poke         modules
ls           lsfs         help         echo         dumpfile     dump
cat          cp           cd           pwd          boot         load
history      sysspeed     settime      setdate      devls        date
Use:
  help <command> to get brief explanation
  <command> --help for command usage (if available)
>help uname
Help on uname:
Usage: uname [OPTION]...
Print system information.  No OPTION is the same as -s.

  -a, --all              all information in the order:
  -s, --kernel-name      kernel name
  -n, --nodename         network node hostname
  -r, --kernel-release   kernel release
  -v, --kernel-version   kernel version
  -m, --machine          machine hardware name
  -o, --operating-system operating system
      --help             display this help and exit
      --version          display version and exit

Please report bugs to <support@simtec.co.uk>
>uname --help
Usage: uname [OPTION]...
Print system information.  No OPTION is the same as -s.

  -a, --all              all information in the order:
  -s, --kernel-name      kernel name
  -n, --nodename         network node hostname
  -r, --kernel-release   kernel release
  -v, --kernel-version   kernel version
  -m, --machine          machine hardware name
  -o, --operating-system operating system
      --help             display this help and exit
      --version          display version and exit

Please report bugs to <support@simtec.co.uk>
>uname -a
ABLE unknown 2.20 #1 Tue Feb 14 12:06:59 GMT 2006 s3c2410x ABLE
>ABLE has the ability to execute shell scripts. These are simple text files with commands in them. The shell commands in the file are executed in consecutive order as if they had been typed at the command line.
To be recognised, a script file must
start with a line #!sh or
#!/bin/sh. After this, commands may be placed
on each line as desired. Lines starting with a “#”
are interpreted as comments and are ignored.
Example 3.6. Example shell script
This is an example shell script which tests the test command and shell quoting.
#!/bin/sh
# ABLE shell test
echo "TEST: test"
[ 1 -lt 2 ] && echo "1 < 2"
[ 2 -lt 1 ] && echo "2 < 1"
[ 2 -gt 1 ] && echo "2 > 1"
[ 1 -gt 2 ] && echo "1 > 2"
echo "TEST: simple variable expansion"
foo=bar
echo $foo
echo "TEST: variable expansion within test"
bar=10
[ 1 -lt $bar ] && echo "1 < $bar"
[ 1 -gt $bar ] && echo "1 > $bar"
echo $bar
echo "TEST: quoting tests"
echo TEST: single quotes
echo '\\ \$ \w $bar $+ $foo \$foo'
echo TEST: double quotes
echo "\\ \$ \w $bar $+ $foo \$foo"
echo TEST: no quotes
echo \\ \$ \w $bar $+ $foo \$foo
echo TEST: quoted single var
echo "$foo$foo"
echo TEST: quoted curly brace single var
echo "${foo}${foo}"
echo TEST: positional parameters
echo There are $# positional parameters
echo All parameters  ">$*< after"
echo Parameter 0,1,2 ">$0 $1 $2<"
echo Parameter 0:$0
echo Parameter 1:$1
echo Parameter 2:$2
echo Parameter 3:$3
When executed, the above script should produce the following output.
>(tftpboot)test.sh one two three
readudp: incorrect length
TEST: test
1 < 2
2 > 1
TEST: simple variable expansion
bar
TEST: variable expansion within test
1 < 10
10
TEST: quoting tests
TEST: single quotes
\\ \$ \w $bar $+ $foo \$foo
TEST: double quotes
\ $ \w 10 $+ bar $foo
TEST: no quotes
\ $ w 10 $+ bar $foo
TEST: quoted single var
barbar
TEST: quoted curly brace single var
barbar
TEST: positional parameters
There are 4 positional parameters
All parameters >one two three< after
Parameter 0,1,2 >(tftpboot)test.sh one two<
Parameter 0:(tftpboot)test.sh
Parameter 1:one
Parameter 2:two
Parameter 3:three
>
ABLE has the ability to store settings in non volatile memory. Currently all supported boards have this feature.
The commands for manipulating the non volatile memory are:
| nvshow |
| nvset |
| nvsave |
| nvclear |
These commands are used to manipulate a set of variables which remain after reset or power cycle and are hence referred to as non-volatile. The variables are numbers, strings or boolean values. The nvshow command can be used without arguments in order to list the current values of all variables.
Example 4.1. Using the nvshow command to list the default variables
>nvshow
shell.hist (is unset)
boot.fs (is unset)
boot.auto  = off
boot.cmd (is unset)
boot.timeout (is unset)
ide.multi-limit (is unset)
usb.hubdepth (is unset)
usb.enable (is unset)
console.level  = 9
console.write (is unset)
console.read (is unset)
fb.enable (is unset)
fb.output (is unset)
fb.refresh (is unset)
fb.y (is unset)
fb.x (is unset)
sys.autoshadow (is unset)
sys.speed (is unset)
>
The variables, their meanings and default values are shown in Part III, “Non-Volatile Variables Reference”.
The nvset command is used to change the values of the variables its syntax is
nvset {variable} {value}
Where the variable
Example 4.2. Using the nvset command
This example shows the setting of three variables, one of each type, and their effects on the variables as shown by nvshow. It should be noted that to set string values with spaces in them the values must be quoted appropriately.
>nvshow
boot-cmd =
boot-time =
shell-hist = 0
auto-boot = off
auto-shadow = off
cons-write =
cons-read =
>nvset boot-cmd "boot (hd0)/vmlinuz root=/dev/hda1"
>nvset boot-time 1
>nvset auto-boot on
>nvshow
boot-cmd = boot (hd0)/vmlinuz root=/dev/hda1
boot-time = 1
shell-hist = 0
auto-boot = on
auto-shadow = off
cons-write =
cons-read =
>
Values altered with the nvset command are not permanent until the nvsave command has been issued. The nvsave command commits the current changes to the non volatile storage, without this the changes will be lost upon a system reset.
The nvclear command can be used to restore the values back to the defaults. The nvsave should not be used to attempt to save these values, this would result in the current settings state being saved not the default values.
Table of Contents
ABLE generally has to communicate with the end user, it does this by using any of the connected devices for which it has drivers.
Console drivers are categorised as either input and output sources. The sources for the console can be found using the console command.
Example 5.1. Using the console command to show available drivers
This shows the available drivers and if they can be used for read, write or both.
>console -d
(-w-a)  s3c2410x-video
(r---)  usbkbd
(rw--)  multi
(rw--)  null
(-w--)  all-wr
(r---)  all-rd
(rw--)  serial
(rw--)  (s3c2410_serial0)
(rw--)  (s3c2410_serial1)
(rw--)  (s3c2410_serial2)
(rw--)  (u16550_serial0)
(rw--)  (u16550_serial1)
>
These drivers allow access to the peripherals on a system. They can be used to provide input from a user to ABLE and output from ABLE to the user. Any number of them may be used simultaneously, it is possible (though not practical) to have ABLE appear on every serial port and video console attached to a system.
Table 5.1. Available console drivers
| Driver | Description |
|---|---|
| s3c2410x-video | Video display driver for the s3c2410 internal controller. |
| sm501-video | Video display driver for the Silicon motion 501 controller. |
| usbkbd | Reads input from any HID USB keyboard attached to the system. |
| ps2kbd | Reads input from any PS2 keyboard attached to the system |
| null | The null driver is a special driver which swallows all output sent to it and never produces any output. |
| multi | The multi driver is a pseudo driver which allows for multiple console sources, it should never be directly used. |
| all-wr | The “all write” driver is the default
output driver if no other is specified. This driver sets
the output to be all the available output devices.
However it only selects the basic
serial driver not any of the other
possible serial targets, this is to limit ABLE to a
sensible number of peripherals (on some boards there
might be more than ten serial ports which will probably be
connected to peripherals which would not respond well to
the ABLE console) |
| all-rd | The “all read” driver is the read
equivalent to the all-wr driver. This
driver selects all the available input sources, again
only selecting the basic serial
driver. |
| serial | This driver is a read/write capable driver which is connected to what is historically considered the “console” serial port. This is typically the first serial port. On the EB2410ITX, for instance, it is the first internal port of the s3c2410, on the EB110ATX it is the footbridge debug port and on the EB675001DIP it is the main 16550 based port. The port will have the settings of 115200 baud, eight data bits, no parity and a single stop bit. |
(s3c2410_serialX) | The serial ports on the s3c2410 are presented as a series of three devices. These devices may have their settings (baud rate, parity etc.) altered as required at initialisation time or later with the setopt command. |
(u16550_serialX) | A given system may have several standard 16550
based serial ports each will have an entry. As with all
serial devices (except the serial
driver) in ABLE the port settings may be altered as
required at initialisation time or later with the setopt command. |
The serial port drivers (s3c2410_serial and u16550_serial) can be given parameters when they are initialised. This is achieved by placing additional comma separated parameters after the driver name within the containing brackets.
The configuration format is in one of the forms:
(driverX)
(driverX,baud)
(driverX,baud,data-format)
Options may be omitted. Such options are either left as the current settings or set to defaults as necessary. The default settings, when the ports are first initialised, is 115200 baud, eight data bits, no parity and a single stop bit (115200,8n1)
The data format is specified as three single character
values. The first denotes the number of data bits, typically
eight or seven. The second sets the parity type one of none
(n), odd (o) or
even (e). The third is the number of stop
bits either one or two.
Example 5.2. Setting serial console driver parameters
To use the s3c2410_serial driver first port at 19200 baud using the default data format
(s3c2410_serial0,19200)
To use the s3c2410_serial driver second port at 38400 baud, 8 data bits, no parity and a single stop bit
(s3c2410_serial1,38400,8n1)
To use the u16550_serial driver first port with the current baud rate, 8 data bits, no parity and a single stop bit
(u16550_serial0,,8n1)
At boot, the console output is sent to all the devices
listed in
console.write. The
list is a comma separated set of driver names (the serial
devices must be bracketed and may contain additional
parameters). Likewise for the console input using the
console.read non volatile
variable. When these variables are not set they default to
all-wr and all-rd
respectively.
The current active drivers may be displayed with:
console -lThe output of this command is split into two sections for the write(console output) and read(console input).
Example 5.3. Showing the consoles of an unconfigured system
>nvshow console.write
console.write (is unset)
>nvshow console.read
console.read (is unset)
>console -l
Console (write):
all write:
 => s3c2410x-video: S3C24XX Framebuffer (640x480 @ 60Hz, 31.5 KHz)
 => null: NULL
 => serial: low level serial

Console (read):
all read:
 => usbkbd: USB Keyboard Driver
 => null: NULL
 => serial: low level serial

>
Once a system is running it is sometimes useful to add an additional driver. Adding a driver allows access to ABLE on that new device. This can be especially useful in scripts which can add displays based upon shell decisions. Section 5.5, “Practical use of the console system” contains more examples on using this feature.
Example 5.4. Adding console drivers to a running system
This example shows the adding of the second s3c2410 serial port, once added the serial port can be used to interact with ABLE
>console -l
Console (write):
all write:
 => s3c2410x-video: S3C24XX Framebuffer (640x480 @ 60Hz, 31.5 KHz)
 => null: NULL
 => serial: low level serial

Console (read):
all read:
 => usbkbd: USB Keyboard Driver
 => null: NULL
 => serial: low level serial

>console -a (s3c2410_serial1)
adding console (s3c2410_serial1)
>console -l
Console (write):
all write:
 => (s3c2410_serial1): fd (s3c2410_serial1)
 => s3c2410x-video: S3C24XX Framebuffer (640x480 @ 60Hz, 31.5 KHz)
 => null: NULL
 => serial: low level serial

Console (read):
all read:
 => (s3c2410_serial1): fd (s3c2410_serial1)
 => usbkbd: USB Keyboard Driver
 => null: NULL
 => serial: low level serial

>
The ABLE console output is split into levels of importance. Only messages with a level lower than the current logging level are displayed.
The logging level is set at boot time by the
console.level
variable, if unset the value defaults to 6. All messages of any
priority can be viewed with the
sysmsg command after
boot.
The practical applications of the console system may not be immediately apparent. The flexibility of the system allows for configurations in deployed solutions which meet the needs to the developer.
The following sections outline a few use cases from which a developer should be able to construct many functionalities. Some of these make use of the scripting capabilities which are described in Chapter 3, Command Line Interface.
Warning
It is possible to configure the console settings so no input or output can be made to the console! In this case the non volatile ignore jumper on the board should be used to recover the unit. This will cause the default “all” drivers to be used.
In this scenario the requirement is to get a serial console on the first 16550 based serial port only. It should be configured to 9600 baud, eight data bits , no parity and a single stop bits.
This is achieved trivially by setting console.read and console.write to
(u16550_serial0,9600,8n1)
Example 5.5. Setup of basic serial console
>nvshow console.write
console.write (is unset)
>nvshow console.read
console.read (is unset)
>nvset console.write (u16550_serial0,9600,8n1)
>nvshow console.write
console.write  = (u16550_serial0,9600,8n1)
>nvset console.read (u16550_serial0,9600,8n1)
>nvshow console.read
console.read  = (u16550_serial0,9600,8n1)
>nvsave
verifying written data...
>
In this scenario no console output whatsoever is required. Generally this is only useful when a project has reached final production and a fixed OS image is being retrieved from reliable storage.
This is straightforward to achieve by using the
“null” driver. Set the
console.read and
console.write variables to:
null
Be sure to set the
boot.cmd and other boot
variables to correctly boot your OS
before setting this or you will need to
recover the system with the physical non volatile ignore
jumper.
As a precaution against loosing the console completely you can add a
console -a serial to the end of the boot.cmd variable.
Example 5.6. Using the null drivers safely
This example shows how the addition of the console command can recover from a situation where otherwise the physical jumper would have to be accessed.
>nvset boot.cmd "(hd0)/nosuchkernel ; console -a serial"
>nvset boot.auto on
>nvset console.write null
>nvset console.read null
>nvsave
verifying written data...
>reset
Autoboot attempt 2, Press any key to abort
Autobooting in   6
>
Even using this technique it is easy to get a system into an unbootable state, because of this setting the consoles to null is generally inadvisable if another approach can be found.
This scenario the console is required if user input is given at a specific point in the boot sequence after a boot logo is displayed.
This is a slightly more complex situation and the
developer may decide to place this in a shell script rather
than try and cram it all into a single
boot.cmd line. The general solution is:
Set the console logging level to 0 to inhibit any other ABLE output
Use the display command to plot the image
Use the echo command to display the user message
Use the read command to wait for user input with a two second timeout
If the user input is the correct key to abort the boot process set a variable to indicate this
If the abort variable is unset start the OS
Set the console log level to something reasonable and start a shell
Example 5.7. A method to display logo and boot abort
#!sh
display -d s3c2410x-video (tftpboot)logo.bmp.Z
echo -n "press c to enter ABLE"
ABORT=no
read -t 2 -n 1 -s RES && [ $RES = "c" ] && ABORT=yes
[ $ABORT = "no" ] && (hd0)kernel root=/dev/hdc1 console=ttySAC0,115200
console -s 6
sh -i
This script would be stored somewhere accessible to
ABLE(flash, hard disc or network) and
boot.cmd set to that
location. Once verified, consoles could be configured as required and
console.level set
to 0.
Table of Contents
ABLE is a powerful tool but its ultimate aim is simply to obtain the operating system image and start its execution with the appropriate parameters. This chapter shows how to use ABLE to achieve this aim using the Command Line Interface.
To obtain the operating system image, ABLE can retrieve data from a number of sources. A source may be a “block” device where data can be random accessed in discrete chunks or a “stream” device where data can be accessed serially. ABLE insulates the user from these details and provides a unified interface.
Any device, for which ABLE has a driver, can act as a source. Devices that ABLE can create sources from include ATA hard drives, ATAPI cdroms, memory devices, USB devices and network interfaces.
ABLE identifies a sources by placing the source name in brackets. Sources can be found from the ABLE command line by using the ls command on the “root” directory.
Example 6.1. Using the ls command to list available sources.
The ls when
performed on the “root” directory, with the
-a option, shows all available sources.
>ls -a -l /
drwxr-xr-x 1 0 0        0 .
drwxr-xr-x 1 0 0        0 ..
brw-rw-rw- 1 0 0   0,   0 nor0
brw-rw-rw- 1 0 0   0,   0 hdc1
brw-rw-rw- 1 0 0   0,   0 hdc
brw-rw-rw- 1 0 0   0,   0 tftpboot
brw-rw-rw- 1 0 0   0,   0 xmodem
brw-rw-rw- 1 0 0   0,   0 console
brw-rw-rw- 1 0 0   0,   0 char4
brw-rw-rw- 1 0 0   0,   0 char3
brw-rw-rw- 1 0 0   0,   0 char2
brw-rw-rw- 1 0 0   0,   0 char1
brw-rw-rw- 1 0 0   0,   0 char0
brw-rw-rw- 1 0 0   0,   0 24cxx0p1
brw-rw-rw- 1 0 0   0,   0 24cxx0
brw-rw-rw- 1 0 0   0,   0 nand0p2
brw-rw-rw- 1 0 0   0,   0 nand0p1
brw-rw-rw- 1 0 0   0,   0 nand0
brw-rw-rw- 1 0 0   0,   0 s3c2410x
lrwxrwxrwx 1 0 0       11 hd0 -> (hdc1):ext2
lrwxrwxrwx 1 0 0        5 s3c2410_serial2 -> char4
lrwxrwxrwx 1 0 0        5 s3c2410_serial1 -> char3
lrwxrwxrwx 1 0 0        5 s3c2410_serial0 -> char2
lrwxrwxrwx 1 0 0        5 u16550_serial1 -> char1
lrwxrwxrwx 1 0 0        5 u16550_serial0 -> char0
lrwxrwxrwx 1 0 0        8 nvram0 -> 24cxx0p1
lrwxrwxrwx 1 0 0       15 flash1 -> (nand0p2):jffs2
lrwxrwxrwx 1 0 0        7 flash0 -> nand0p1
>
The sources listed as links are “aliases” which build upon or “cook” the behaviour of other sources.
The previous section described how to identify a possible data source within ABLE. Typically these data sources are a raw unprocessed set of data, to be useful a data source is generally partitioned and has a filing system placed upon it. The process of building upon a raw data source is sometimes referred to as “cooking” which gives a cooked data source.
To make the users interaction with ABLE easier a set of alias sources are automatically generated. Each of these aliases may be referred to as a source in its own right. The ls command can be used to list these aliases.
Example 6.2. Using the ls command to list cooked sources
The ls command performed on the root directory.
>ls -l /
lrwxrwxrwx 1 0 0       11 hd0 -> (hdc1):ext2
lrwxrwxrwx 1 0 0        8 nvram0 -> 24cxx0p1
lrwxrwxrwx 1 0 0       15 flash1 -> (nand0p2):jffs2
lrwxrwxrwx 1 0 0        7 flash0 -> nand0p1
>
ABLE detects and creates a cooked source for every raw source that can provide files. Each of the raw sources will be examined for recognised filesystems and, if a partitioned device, each partition will be scanned. ABLE can interpret several filesystems, these include EXT2, FFS, ISO9660 (including rockridge extensions) and FAT. Filesystems are only scanned for on suitable sources i.e. ISO9660 filesystems would only be searched for on cdrom sources.
The user need not use the aliases and may specify the full source descriptor if desired. The sources “(hd0)” and “((hdc1):ext2)” from the previous examples are completely equivalent. The full construct may be used to attempt to force ABLE to interpret filesystems where it has not automatically detected one but this will almost certainly result in unexpected and incorrect behaviour.
The network is treated differently to other sources. It is accessed through a source which defines the access protocol. Currently the only supported access protocol is TFTP. The tftpboot source uses the currently configured network interface which is set with ifconfig. Chapter 8, Networking describes the configuring and setup of network interfaces in more detail.
The tftpboot source cannot be enumerated, that is a list of files cannot be obtained with the ls command, the filename to be retrieved must be already known. To use the filename provided by the DHCP server the tftpboot source can be used without a file specified.
Example 6.3. Using the tftpboot source
This example shows that the tftpboot source is unable to enumerate the contents of the source, using the tftpboot source with an explicit filename and using the server provided filename when its present and when not set.
>ls -l (tftpboot)
-r--r--r--    0 0 0       -1 (tftpboot)
>sum (tftpboot)batty
18014 33 (tftpboot)batty
>sum (tftpboot)
tftpboot: using bootp filename 'batty'
18014 33 (tftpboot)
>sum (tftpboot)
tftpboot: using bootp filename ''
warning: filename is null, tftp may fail
Error loading (tftpboot) :No such file or directory
>
The XModem source is treated differently to other sources. It provides a way to obtain files over a serial connection using the XModem protocol. The implementation of the XModem protocol within ABLE accepts 128byte or 1Kbyte packets and checksum or CRC16 checks.
The filename used with the XModem source is the serial port source on which to perform the transfer, these can be identified as aliases for char sources within a full source listing (see Example 6.1, “Using the ls command to list available sources.”). The parameters for a serial driver source are more fully described in Section 5.2, “Setting parameters on serial drivers”.
If the transfer is performed on the same source as is being
used for the console care must be taken not to use commands
which produce output during their reading of the file. Because
of this the sum command may be used in its
non verbose mode but would cause the transfer to fail if the
-v option is used because it would output .
characters to denote progress. Similarly the
dumpfile and cat commands
would cause a failure. Obviously this is not an issue if the
transfer source is not used as a source for the console.
Example 6.4. Using the XModem source
This example shows a file being checksummed from the first S3C2410 serial port source. The C characters are the XModem receive characters signifying the start of the XModem sequence. The same file is then checksummed using the network interface to show the correctness of the transfer.
>sum (xmodem)s3c2410_serial0
CCCCCC
39872 33 (xmodem)s3c2410_serial0
>sum (tftpboot)batty
39872 33 (tftpboot)batty
>
Sources with filesystems that support enumeration (EXT2, ISO9660 etc.) can be browsed and navigated. A filesystem arranges information as files within directories. The file navigation commands (see File Navigation) can be used to change the present working directory (PWD) and enumerate (list) the contents of directories.
A filesystem is presented as a hierarchical tree of
directories which contain files and more directories. ABLE
presents directories in the UNIX® manner and includes the . and
.. directories which represent the current directory and the
parent directory respectively. Any file or directory name
prefixed by a . is considered “hidden” and will not
be listed with the ls command unless the
-a option is used.
ABLE starts with the PWD set to the root directory /. As already seen in Example 6.1, “Using the ls command to list available sources.” this directory contains all available sources, by default only the alias sources are listed, the raw sources being “hidden”.
The cd command is used to change the PWD. The ls command with no parameters lists the available files in the PWD.
Once a file is located the file manipulation commands can be used (see File manipulation commands) to examine or verify the file. The file command is especially useful for determining if ABLE can identify a file as an operating system image.
ABLE uses a set of heuristics to determine a files contents. The methods used include “magic” numbers (sequences of well known values at fixed offsets in the file) and common executable binary format headers. The overall approach is similar to the UNIX® file command which is provided with the ABLE shell built-in file command.
Once a files contents are identified ABLE will use the appropriate module to load and execute the file. If a unrecognised filetype or one for which no loader module is present, ABLE will report the error and return to the command line.
This file type is identified by the string “#!sh” in the first four bytes of the file. Such files are executed with the ABLE shell as detailed in Section 3.8, “Shell script”.
This file type is identified by the hexadecimal value AB1E0001 at the beginning of the executable file. This filetype is used for ABLE binary program extensions for code which it is not desirable to ship within ABLE because of space or licencing constraints. Examples of such programs are the romwrite reflash tool and batty test tool.
This file type is identified by the hexadecimal value 016F2818 thirty six bytes into the file. This file type is used for compressed LINUX® kernel images.
When a file of this type is executed ABLE sets up an appropriate parameter list and starts execution of the kernel image. Full details of the ARM LINUX® booting procedure can be found in the Booting ARM Linux document.
The ELF and AOUT binary file detection is provided for NetBSD and OpenBSD operation. The ELF header is detected from the hexadecimal value 464C457F at the beginning of the file and the various AOUT formats with several differing magic numbers (The AOUT types supported are the old “impure” format, the read-only text format, the “compact” demand load format and the demand load format.
When a file of this type is executed the relevant sections are loaded and relocated as described by their binary headers. The code is entered at its entry point with the MMU running and the parameters and command line passed as expected by the BSD kernel.
Although the LINUX® kernel can be extracted as an ELF object ABLE is unlikely to execute the image correctly, the zImage format should be used.
UNIX® compress files are identified by their first two bytes which contain 0x9D and 0x1F. These files when loaded (to be executed) are decompressed and the result file typed again.
Gzip files are identified by their header of 0x8B1F at the beginning of the file. These files when loaded (to be executed) are decompressed and the result file typed again.
These files are identified by various methods but all share the common property that they cannot be executed. These files must be manipulated with other commands such as the display command for images, the cat command for text and the dumpfile for data.
Files of this type are identified by their format which must be correct for the first few lines of the file. When loaded the whole file must be of the correct format.
The recognised S-Record format is well defined. Each file consists of a series of lines. Each line begins with an S character and is terminated by a newline. Each line represents an individual record, its type is determined by the second character on the line (0 to 9) followed by a record length, type dependant data and finally a checksum. All data after the type field is presented as 8 bit octets coded as two hexadecimal values e.g. the value 255 is presented as the text FF.
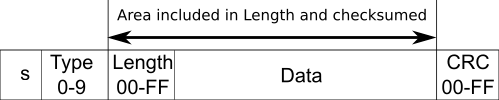
The checksum is calculated as a ones complement of the data octets including the length.
The header record is typically the first record in the file, ABLE does not interpret this record beyond printing the data section as ASCII output on the console. Any number of headers may be included as they have no impact on the decoding of the other lines.

The four byte (32 bit) addressed data record may be repeated as often as required to load all the program into memory. The four byte address gives access to the entire 4GB memory region of the ARM memory map. The address is specified as a physical location.

The four byte (32 bit) address end record is used to specify the address that execution will start from. The address is specified as a physical location. This record should only occur once at the end of the data.

During the parsing of an S-Record it is possible a syntax error in the input data may occur. If this happens an error report will be reported in the form:
error 1 on line 1
Table 6.1. S-Record loader error codes
| Code | Error |
|---|---|
| 1 | Line didn't start with S |
| 2 | Line finished before type |
| 3 | Type was not 0-9 |
| 4 | Line finished before length |
| 5 | Length field contained invalid characters |
| 6 | Line finished early in data |
| 7 | Data contained invalid characters |
| 8 | Checksum failed |
Where the errors refer to invalid characters this means characters
other than 0-9 and A-E were found in the line.
Example 6.5. An example S-Record
The S0 record starts the file. The S3 records contain the data. The S7 record contains the entry address and completes the file load.
S0030000FC
.
.
S325000004403C0880018D08DD900000000011000026000000003C0880012508DC50C50000B401
S32500000460C50100B8C50200BCC50300C0C50400C4C50500C8C50600CCC50700D0C50800D4FA
S32500000480C50900D8C50A00DCC50B00E0C50C00E4C50D00E8C50E00ECC50F00F0C51000F49A
S325000004A0C51100F8C51200FCC5130100C5140104C5150108C516010CC5170110C518011434
.
.
S70500000000FA
Once a complete file path to an operating system image has been decided upon the boot process is simple. ABLE may be used to start a recognised operating system in two ways.
The two methods for starting an operating system are the “setargs, load and boot” method or the “command line” method. As can be seen from Example 6.6, “Using the "setargs, load and boot" method to start a LINUX® kernel” and Example 6.7, “Using the "command line" method to start a LINUX® kernel” both these methods produce exactly the same result and the kernel is passed exactly the same parameters in both cases.
The “command line” method is preferred as it is simpler and more obvious but there are some limited circumstances where it is not sufficient (multiple boot files) and the “setargs, load and boot” is necessary.
The "setargs, load and boot" method as its description suggests uses a three stage method in order to start an operating system:
This method gives the most flexibility and control but is cumbersome to use.
Example 6.6. Using the "setargs, load and boot" method to start a LINUX® kernel
>setargs "root=/dev/hda1 console=ttySAC0,115200"
>load (hd0)vmlinuz
loaded (hd0)vmlinuz, 0x16a6e0 bytes at 0x00008000
>boot
boot: booting 'linux'
Booting Linux
Uncompressing Linux.............................................................
Linux version 2.6.11 (vince@gerald)
CPU: ARM920Tid(wb) [41129200] revision 0 (ARMv4T)
CPU0: D VIVT write-back cache
CPU0: I cache: 16384 bytes, associativity 64, 32 byte lines, 8 sets
CPU0: D cache: 16384 bytes, associativity 64, 32 byte lines, 8 sets
Machine: Simtec-BAST
Memory policy: ECC disabled, Data cache writeback
CPU S3C2410A (id 0x32410002)
S3C2410: core 266.000 MHz, memory 133.000 MHz, peripheral 66.500 MHz
S3C2410 Clocks, (c) 2004 Simtec Electronics
USB Power Control, (c) 2004 Simtec Electronics
Built 1 zonelists
Kernel command line: root=/dev/hda1 console=ttySAC0,115200
...
A user wishing to use the this method in the boot.cmd setting should make use of the “;” to separate the commands. To set the command from the above example would be
nvsetboot.cmd"setargs root=/dev/hda1 console=ttySAC0,115200"; \ load(hd0)vmlinuz; boot"
The "command line" method is a less flexible but much simpler and obvious method of starting an OS kernel or image. The image to be executed is simply given on the command line followed by its parameters, exactly like running any other command.
Note
Any parameters set with the setargs command are not considered when using this method.
Example 6.7. Using the "command line" method to start a LINUX® kernel
>(hd0)vmlinuz root=/dev/hda1 console=ttySAC0,115200
loaded (hd0)vmlinuz, 0x16a6e0 bytes at 0x00008000
boot: booting 'linux'
Booting Linux
Uncompressing Linux.............................................................
Linux version 2.6.11 (vince@gerald)
CPU: ARM920Tid(wb) [41129200] revision 0 (ARMv4T)
CPU0: D VIVT write-back cache
CPU0: I cache: 16384 bytes, associativity 64, 32 byte lines, 8 sets
CPU0: D cache: 16384 bytes, associativity 64, 32 byte lines, 8 sets
Machine: Simtec-BAST
Memory policy: ECC disabled, Data cache writeback
CPU S3C2410A (id 0x32410002)
S3C2410: core 266.000 MHz, memory 133.000 MHz, peripheral 66.500 MHz
S3C2410 Clocks, (c) 2004 Simtec Electronics
USB Power Control, (c) 2004 Simtec Electronics
Built 1 zonelists
Kernel command line: root=/dev/hda1 console=ttySAC0,115200
...
ABLE has a flexible system to automatically run a given user
command at boot time. The command to be run is controlled by the
boot.cmd non volatile
variable. If the boot command is not set it defaults to the
autoboot command.
The execution of the boot process may be prevented by setting
the boot.auto variable
to true. If the boot.auto variable is not set or set
to false the boot command is run after a delay set by the
boot.timeout variable. The delay
is in seconds and allows the user to abort the boot process by
pressing a key. The console input from which the keypress is
accepted is described in detail in Chapter 5, ABLE Console.
The boot command is executed by the ABLE shell. Any shell
script command may be placed in the boot.cmd seperated by
semicolons. If more than a small number of commands need to be
issued they should be placed in a shell script and the script
executed.
Example 7.1. Displaying a logo during the automatic boot process
This example shows how the boot.cmd can be set to display a
logo on the video console before continuing with an automated
boot using the autoboot command.
>nvset boot.cmd "display -d s3c2410x-video (tftpboot)logo.bmp.Z ; autoboot"
>nvshow boot.cmd
boot.cmd  = display -d s3c2410x-video (tftpboot)logo.bmp.Z ; autoboot
>nvset boot.auto true
>nvshow boot.auto
boot.auto  = on
>nvset boot.timeout 1
>nvshow boot.timeout
boot.timeout  = 1
>nvset console.level 5
>nvsave
>reset
No Available Targets
>
Some of the examples presented in Section 5.5, “Practical use of the console system” make user of the automatic boot process and may be of interest.
Figure 7.1, “Initial boot operations” shows the
logic of the initial start process. The operation is to loop for
keyboard input for the time specified in boot.timeout. If no user input is
received before the timeout the boot.cmd variable is inspected, if
set the command is executed with the ABLE shell otherwise the
autoboot command is
executed by default.
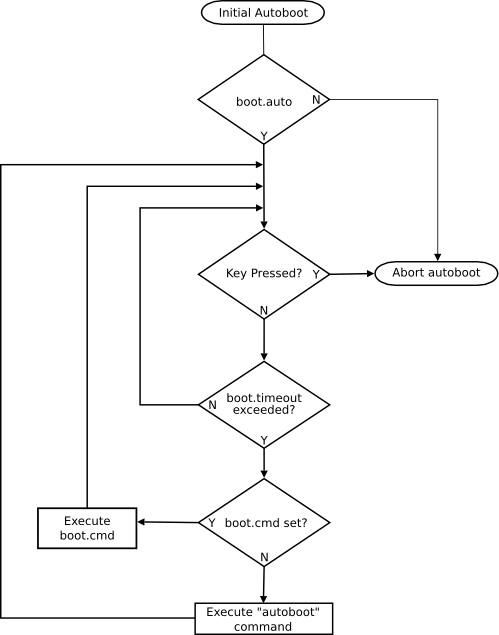
Table of Contents
ABLE has basic networking facilities allowing it to transfer data using the User Datagram Protocol (UDP) running over Internet Protocol (IP).
ABLE has drivers for a common set of Ethernet adaptors encompasing those found on Simtec Electronics boards and common PCI cards. The supported cards include those based upon Davicom DM9000 chipset, Tulip chipset, Realtek chipset and the traditional NE2000 based devices. ABLE does not currently have support for serial based protocols such as Serial Line Internet Protocol (SLIP) or Point to Point Protocol (PPP) but there is provision for XModem protocol (see Section 6.4, “XModem source”)
IP network settings can set maunually or be retrieved from the network from a Dynamic Host Configuration Protocol (DHCP) or Bootstrap Protocol (BOOTP) server.
To transfer files ABLE uses the Trivial File Transfer Protocol (TFTP) protocol. TFTP is a very simple protocol it lacks the ability to list directory contents, has no authentication or encryption mechanisms and performs its transfers in lock-step with only one packet on the network at any time which reduces its performance. Despite its lack of facilitys it is sufficient for retreving files.
ABLE will create an interface for every supported device it can find. All IP capable interfaces available on a platform can be listed with the ifconfig command.
>ifconfig -a
dm0       Link encap:Ethernet  HWaddr 00:01:3d:00:01:6a
          inet addr:0.0.0.0  Mask:0.255.255.255
          gateway addr:0.0.0.0  tftpserver:0.0.0.0
          UP MTU:1500  Metric:1

ne0       Link encap:Ethernet  HWaddr 00:01:3d:00:01:6b
          inet addr:0.0.0.0  Mask:0.0.0.0
          gateway addr:0.0.0.0  tftpserver:0.0.0.0
          MTU:1500  Metric:1

>
In this case two interfaces are available dm0 and ne0. Some platforms may have more than one of the same type of interface which will be presented as dm0, dm1, dm2 etc.
Once the required interface is identified it can be
configured for use. This is achieved using the
up option to the ifconfig command.
This is only required if the required interface does not already
have the UP flag, in the above case the dm0 interface is marked
such because the first interface is marked up by default.
If the DHCP protocol is used no futher configuration is required and the settings will be recovered the first time the interface is accessed.
If an automatic server is unavailable or cannot be used for other reasons manual configuration is neccisary. Applying IP settings manually requires an IP address and netmask and an optional default gateway. Although not an IP setting the address of the TFTP server is specified too. The ifconfig command is used to set the desired values.
Full details on setting fixed addresses and other aspects of configuring interfaces can be found in the ifconfig command documentation.
Once the interface settings are configured files may be
retrieved from the network using the TFTP protocol. Files are
accessed with the (tftpboot) source. If no
filename is given the one provided by
the DHCP server will be used, if the DHCP server doesn't
provide a filename one based upon the hardware unique ID is used
(the
hwinfo command can
be used to find the unique ID).
Most of the operations described here are not usually required if a properly configured DHCP and TFTP servers are used. Any file that can be accessed using TFTP can be used wherever a filename is used within ABLE, no distinction between network and local files is explicitly made (the one exception being that filesystem stat calls cannot be sensibly answered via TFTP).
The ability to use the network in this way allows for a very rapid compile, execute and test cycle. No physical media is involved and mistakes can be rectified and retested in a short time.
Example 8.1. Executing a program using the tftpboot pseudo filesystem
This example shows the batty board test tool being retrieved over the network using a default DHCP configuration.
>(tftpboot)batty
tftp: attempting bootp
bootp: sending request
bootp: serverip: 192.168.7.1
bootp: netmask: 255.255.255.0
bootp: serverip: 192.168.7.1
bootp: netmask: 255.255.255.0
bootp: address: 192.168.7.222
.....loaded (tftpboot)batty, 0x8040 bytes at 0x00008000
boot: booting 'able app1'
Simtec Board Test Tool, Version 0.10
(c) 2005 Simtec Electronics

EB2410ITX (BAST) Test Suite

Testing S3C24XX CPU Core
 CPU ID 32410002, OK [S3C2410A]
 Testing internal SRAM block
  Pattern: all ones
  Pattern: all zeros
  Pattern: alternate zero/ones (LSB set)
  Pattern: alternate zero/ones (LSB unset)
  Writing address to each location

 Testing system RAM [0x00400000..0x07d00000]
  Pattern: all ones
  Pattern: all zeros
  Pattern: alternate zero/ones (LSB set)
  Pattern: alternate zero/ones (LSB unset)
  Writing address to each location

 Checking ABLE CRC
  CRC OK

 Searching for ABLE info
  Version 208
  Release 2005041001
  Supported machine number 3
  Supported machine number 6

Testing CPLD registers
 CPLD ID register (value 00) OK


DONE: 13 tests, 13 ok, 0 failed, 0 warnings
PASSED: all tests OK
>
ABLE is usually stored in non-volatile memory. It may be upgraded either by running the romwrite ABLE executable or by reprogramming the non-volatile storage directly e.g. by use of an EEPROM programmer.
It is generally recommended that users only upgrade if they are suffering a specific issue with a prior version or require an added feature. Every effort is made to ensure errors are not introduced in updates but Simtec Electronics offer no warranty.
Simtec Electronics generally provide ABLE upgrades as a romwrite package which combines both the programming utility and the upgrade in a single binary image.
Upgrades to the latest version can be obtained for each supported product on the Simtec Electronics website from the resource pages.
A version of ABLE which is up-to-date at the time of shipping is provided on the boards support CD. It is always recommended that the latest update be obtained from the website in preference to the CD version.
The upgrade can be retrieved from any available boot device. Some examples for a EB2410ITX are:
| cdrom - (cd0)eb2410itx-romwrite-v220.bin |
| tftp - (tftpboot)eb2410itx-romwrite-v220.bin |
| hard disc - (hd0)eb2410itx-romwrite-v220.bin |
ABLE can navigate several types of filesystem Section 6.5, “Navigating a filesystem” has more details on how to locate files. Upgrades, because of their transient nature, are typically retrieved from the network using TFTP Chapter 8, Networking details configuring and using network interfaces.
ABLE may need to be moved to execute from memory on some platforms such as the EB7500ATX. This is achieved with the shadow command. If the shadow operation is not performed, then romwrite will prompt the user to issue the shadow command.
Example 9.1. The romwrite command requiring the shadow command
>(tftpboot)eb2410itx-romwrite-v174.bin
.............................boot: booting 'able app1'
ROM Write: Version 1.00
(c) 2002, 2003 Simtec Electronics

cannot run without ABLE shadowed.
use the 'shadow' command and then re-run this application
>
The romwrite command also performs several checks to ensure the update is suitable. These include downgrading and checking the machine type matches the image.
Warning
Overriding any warnings may result in an inoperable system, so be sure you understand any warnings before continuing with the upgrade.
Example 9.2. The romwrite command producing warnings
>(tftpboot)eb110atx-romwrite-v173.bin
............................boot: booting 'able app1'
ROM Write: Version 1.00
(c) 2002, 2003 Simtec Electronics

Replacing current version 174 with image version 173
warning: Image version 173 is lower than running version 174
Image release number is 2003062801
warning: Image release 2003062801 is lower than running release 2003071701
warning: machine 3 is not supported by image
Warnings detected, proceed with upgrade (yes to continue) ? no
Upgraded cancelled by user input
>
The romwrite command may fail at the “Erasing Device” stage if the system supports physical non-volatile storage protection. This feature is currently present on all Simtec Electronics boards except the EB110ATX
A successful flash operation will result in a message asking the user to reset the platform. Until the system is reset, the old version of ABLE is still running.
Example 9.3. The romwrite command completing successfully
>shadow
shadowing ABLE into main memory
>(tftpboot)able.bast
............................boot: booting 'able app1'
ROM Write: Version 1.00
(c) 2002, 2003 Simtec Electronics

Replacing current version 174 with image version 220
Image release number is 2003091701
Machine is BAST
Flash: SST 39LF160 [0x00BF, 0x2782]
Initialising programmer:
Erasing device: done
Writing data: ............. done
Verifying data: ......................... done
Finishing operation:  done
Done! - Please Reset machine
>
The sections in Part II split the commands available into groupings by type.
Each command is documented in the standard UNIX® manual page layout. The page is separated into several parts:
- Name
The name of the command and its purpose.
- Synopsis
Command synopsis which may illustrate several invocations.
- Options
This part is only present if the command has arguments. The command arguments are listed together with a description.
- Description
Describes the detailed use of the command.
- See also
This optional section gives references to other commands which may be relevant.
Conventions used in this part:
- command text.
-
{
arguments} within { } are required. replaceabletext for arguments.-
[
arguments] within [ ] are optional. argument|argumentseparated by | cannot be used together.argument... is repeatable-
[
expression]... entire expression is repeatable.
Table 5. Commands in alphabetical order
| Command | Purpose |
|---|---|
| autoboot | Attempt to locate and boot suitable images automatically. |
| boot | Starts loaded OS images |
| bast-hdlcd | Manipulate an HD44780 attached to the EB2410ITX LCD Module port. |
| bast-at | Perform an audio test. |
| bast-at2 | Perform BAST audio test copies the line in to the line out |
| cat | Displays contents of a text file |
| cd | Change present working directory |
| console | Controls ABLE console. |
| cp | Copy a file. |
| date | Show the current real time clock date and time. |
| devls | Lists information about devices attached to a system |
| display | Display and image on console. |
| dmcfg-rd | Debug command to read Davicom EEPROM |
| dmcfg-wr | Debug command to write Davicom EEPROM |
| dump | Displays an area of memory in hex dump |
| dumpfile | Displays a file in hex dump |
| echo | Output some text to standard output |
| exit | Exit ABLE shell |
| file | Tests each argument in an attempt to classify it. |
| help | Display help on built in commands |
| history | Lists the commands in the command line history. |
| hwinfo | Print hardware information. |
| ifconfig | Network device configuration and selection |
| load | Load executable images |
| ls | List files in directory |
| lsfs | List available filesystems |
| man | Manual page display |
| mii | MII phy control |
| meminfo | Shows memory information. |
| memset | Set range of memory to a specific value. |
| modules | List ABLE modules |
| nvclear | Reset non-volatile settings to defaults |
| nvset | Set non-volatile parameters |
| nvsave | Save altered non-volatile settings |
| nvshow | Show non-volatile parameters |
| nvunset | Clears non-volatile parameter |
| peek | Examine a memory location |
| pic-rd | Read a value to the PMU PIC |
| pic-wr | Write a value to the PMU PIC |
| pmu | Power management control |
| poke | Poke memory location |
| pwd | Show present working directory |
| read | Reads a line of input into shell variables |
| reset | Reset machine |
| sbcd(1) | Manipulates the board configuration data. |
| setargs | Sets arguments to be passed to an OS started with the boot command |
| setdate | Sets the date in the real time clock |
| setopt | Sets device options. |
| settime | Sets the real time clock |
| sh | Start a new ABLE shell |
| showargs | Shows arguments to be passed to any booted OS |
| shadow | Moves ABLE into RAM |
| showhz | Shows how long a system has been running |
| sleep | Delay for a specified amount of time |
| sum | Checksum a file |
| sysmsg | Show system messages. |
| sysspeed | Sets the system clock speed |
| tasks | Displays tasks running on system. |
| test | Performs test operations |
| tick | check system timing. |
| uname | Print system identification |
| version | Display ABLE shell version |
| vtp1 | Video test pattern |
| vtp2 | Video test pattern |
| vtp3 | Video test pattern |
| vtp4 | Video test pattern |
| vtp5 | Video test pattern |
| wrout | Write a string to an output file. |
Table of Contents
- I. Core Commands
- autoboot — Attempt to locate and boot suitable images automatically.
- console — Controls ABLE console.
- date — Show the current real time clock date and time.
- devls — Lists information about devices attached to a system
- display — Display and image on console.
- help — Display help on built in commands
- history — Lists the commands in the command line history.
- hwinfo — Print hardware information.
- man — Manual page display
- meminfo — Shows memory information.
- modules — List ABLE modules
- pmu — Power management control
- reset — Reset machine
- sbcd — Manipulates the board configuration data.
- setdate — Sets the date in the real time clock
- setopt — Sets device options.
- settime — Sets the real time clock
- shadow — Moves ABLE into RAM
- showhz — Shows how long a system has been running
- sysmsg — Show system messages.
- sysspeed — Sets the system clockspeed
- tasks — Displays task threads currently running on system.
- uname — Print system identification
- version — Display ABLE shell version
- wrout — Write a string to an output file.
- II. Shell Commands
- III. Network operations
- IV. File Navigation
- V. File manipulation commands
- VI. Non-volatile settings
- VII. OS manipulation commands
- VIII. Debugging commands
- bast-at — Perform an audio test.
- bast-at2 — Perform BAST audio test copies the line in to the line out
- bast-hdlcd — Manipulate an HD44780 attached to the EB2410ITX LCD Module port.
- dmcfg-rd — Debug command to read Davicom EEPROM
- dmcfg-wr — Debug command to write Davicom EEPROM
- dump — Displays an area of memory in hex dump
- memset — Set range of memory to a specific value.
- peek — Examine memory location
- pic-rd — Read a value to the PMU PIC
- pic-wr — Write a value to the PMU PIC
- poke — Poke memory location
- tick — Check system timing.
- vtp1 — Video test pattern
- vtp2 — Video test pattern
- vtp3 — Video test pattern
- vtp4 — Video test pattern
- vtp5 — Video test pattern
These are the core commands available from the shell command line of ABLE from version 2.20 and later.
Table of Contents
- autoboot — Attempt to locate and boot suitable images automatically.
- console — Controls ABLE console.
- date — Show the current real time clock date and time.
- devls — Lists information about devices attached to a system
- display — Display and image on console.
- help — Display help on built in commands
- history — Lists the commands in the command line history.
- hwinfo — Print hardware information.
- man — Manual page display
- meminfo — Shows memory information.
- modules — List ABLE modules
- pmu — Power management control
- reset — Reset machine
- sbcd — Manipulates the board configuration data.
- setdate — Sets the date in the real time clock
- setopt — Sets device options.
- settime — Sets the real time clock
- shadow — Moves ABLE into RAM
- showhz — Shows how long a system has been running
- sysmsg — Show system messages.
- sysspeed — Sets the system clockspeed
- tasks — Displays task threads currently running on system.
- uname — Print system identification
- version — Display ABLE shell version
- wrout — Write a string to an output file.
Name
autoboot — Attempt to locate and boot suitable images automatically.
Synopsis
autoboot
Description
This command may be executed from the Command Line Interface however it is usually executed as part of the autoboot sequence as explained in Chapter 7, Starting an Operating System Automatically.
This command takes each filesystem in turn from the boot.fs variable and searches it for bootable images. As each possible image is located a suitable set of parameters are derived (if possible) and the image and the commands are added to a list.
Once all the filesystems have been checked the list is displayed and a countdown commenced starting with the boot.timeout value. If a user selects on of the entries they are then prompted to alter the guessed parameters and asked if they wish to make the resulting command line the boot.cmd entry. If the user does not interact with the command before the countdown completes the first entry on the list is attempted, if that fails the second is tried and so on down the list until all entries have been attempted.
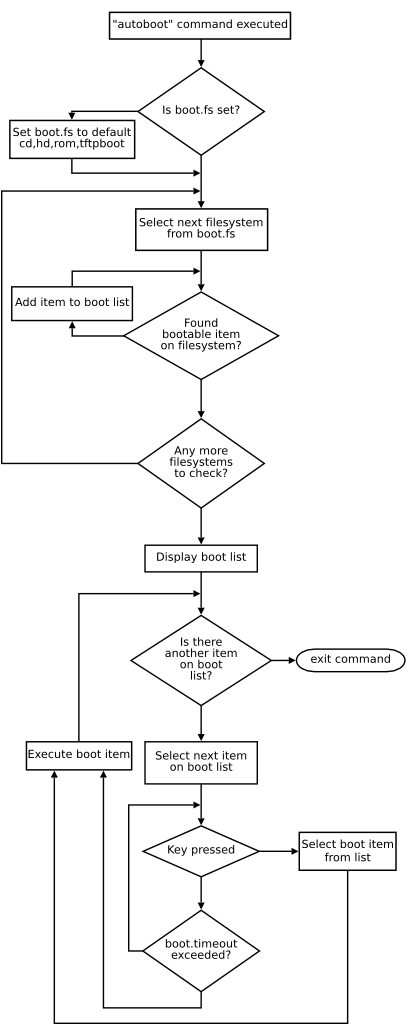
Name
console — Controls ABLE console.
Synopsis
console [-a, --add {driver}] [-d, --drivers] [-s, --level [level]] [-l, --list] [-h, --help]
Options
-a, --addadds a new console driver to those currently active.
-d, --driversshows all available display drivers which can be used with the
-aswitch.-s, --levelsets the logging level to new value (if given) and displays the current logging level.
-l, --listlists the currently active consoles.
-h, --helpdisplays the short help text and exits.
Description
This command is used to manipulate the ABLE console
system. At boot, the active console is determined by the
console.read and
console.write
values. The console command allows the
current active console sources to be altered while the
system is running.
The console command allows the level of messages displayed (“logged”) on the console to be altered.
Any messages with a level lower than the current log level will be output to the console. For example, if the logging level is set to 6 all messages except those of level Log and Debug will be shown.
The initial log level is controlled by console.level and defaults to 6 if the
variable is unset.
Table 6. Defined console log levels
| Level | Value | Description |
|---|---|---|
| Critical | 0 | Critical errors that will prevent proper continued operation of ABLE |
| Error | 1 | Error messages |
| Warn | 3 | Warning messages |
| Info | 5 | Messages which give more information about an operation |
| Log | 7 | Messages which are the result of normal operation |
| Debug | 9 | Debugging messages, these will rarely be seen on non debugging releases of ABLE. |
Example 29. Using the console command
This example shows the use of the console command and its switches. First all the available drivers are listed, then the current log level is displayed and changed. Finally the active drivers are listed, a new driver added and listed again to show the addition was successful.
>console -d
(-w-a)  s3c2410x-video
(r---)  usbkbd
(rw--)  null
(-w--)  all-wr
(r---)  all-rd
(rw--)  serial
(rw--)  (s3c2410_serial2)
(rw--)  (s3c2410_serial1)
(rw--)  (s3c2410_serial0)
>console -s
Current console level 6
>console -s 4
Changing log level 6 to 4
>console -l
Console (write):
all write:
 => s3c2410x-video: S3C24XX Framebuffer (640x480 @ 60Hz, 31.5 KHz)
 => null: NULL
 => serial: low level serial
Console (read):
all read:
 => usbkbd: USB Keyboard Driver
 => null: NULL
 => serial: low level serial
>console -a (s3c2410_serial1)
adding console (s3c2410_serial1)
>console -l
Console (write):
all write:
 => (s3c2410_serial1): fd (s3c2410_serial1)
 => s3c2410x-video: S3C24XX Framebuffer (640x480 @ 60Hz, 31.5 KHz)
 => null: NULL
 => serial: low level serial
Console (read):
all read:
 => (s3c2410_serial1): fd (s3c2410_serial1)
 => usbkbd: USB Keyboard Driver
 => null: NULL
 => serial: low level serial
>
Name
date — Show the current real time clock date and time.
Synopsis
date
Description
Show the current real time clock date and time. The settime and setdate commands can be used to set the real time clock and date.
Example 30. Using the date command
This example shows the use of the date command to get the current date and time, the date and time being kept across a reset and finally used to show a delay.
>date
Fri Mar 10 01:38:00 2006
>date
Fri Mar 10 01:38:08 2006
>reset
selected all-wr for console write
selected all-rd for console read
DRAM: 128 Mb (134217728 bytes)
BAST: PMU version 1.02, ID 00:01:3d:00:01:6a
ABLE 2.20 Copyright 2001-2005,2006 Simtec Electronics
hdb: ATAPI CDROM: TOSHIBA CD-ROM XM-7002B PIO mode 4
hdc: FUJITSU MHF2043AT: ATA PIO mode 4
hdc:Diagnosing disc drive: ok
(hdc) 4GB
(hdb) Drive Empty
DM9000: dm0: r1, 00:01:3d:00:01:6a int phy, link ok, 100Mbit full duplex
NE2000: ne0: ISA/Generic, 00:01:3d:00:01:6b
ne0: PHY 0180:bb10, state 7869, LPA 45e1,0007
ne0: starting PHY reset (260)
TMP101: not detected
sys.autoshadow unset, automatically shadowing
>date
Fri Mar 10 01:38:24 2006
>date; sleep 22; date
Fri Mar 10 01:38:44 2006
Fri Mar 10 01:39:06 2006
>
Name
devls — Lists information about devices attached to a system
Synopsis
devls [-v] [-h]
Description
This command can be used to obtain a complete list of the devices attached to the system.
Example 31. Using the devls command
This shows the use of a simple devls command on the EB2410ITX. The output shows a list of all devices within the system and information on those devices where known.
>devls
bus: usb on
bus: IIC on
  [03000002,03000002]
  [03000002,03000001]
  [03000004,03000001]
  [03000000,0300000a]
  [03000003,03007fff]
  [03000003,03007006]
bus: bast on memory 00000000..80000000
  [03000000,03000006] Samsung S3C2410, 1 IO regions
  [03000009,03000001] Samsung S3C2410 OHCI, 1 IO regions
  [03000000,0300000d] Samsung UART, 1 IO regions
  [03000000,0300000d] Samsung UART, 1 IO regions
  [03000000,0300000d] Samsung UART, 1 IO regions
  [03000000,03000001] bast-ide1, 2 IO regions
  [03000000,03000001] bast-ide2, 2 IO regions
  [03000000,03000008] asix-ax88796, 1 IO regions
  [03000001,03009000] dm9000, 1 IO regions
  [03000000,03000000] superio-serial1, 1 IO regions
  [03000000,03000000] superio-serial2, 1 IO regions
  [03000000,03000005] rombank0, 1 IO regions
>
This shows the devls command used in verbose mode on a PCI system.
>devls -v
bus: isa on 7c000000..7c010000
  [010013ea,01010000] [ 0x0072 ] ds1687
  [03000000,03000000] [ 0x03f8 ] 16550
  [03000000,03000000] [ 0x02f8 ] 16550
  [03000000,03000004] [ 0x0060 ] intel8042
bus: pci on dc21285
  [010010b9,01001533] [ 0. 7.0 ] 10b9:1533 Rev 0xc3  Class 6.1.0
   CmdStatus 3200000f:
        CMD: IO MEM MASTER SPECIAL
     Status: DEVSEL-MED MT-ABRT M-ABRT

  [01001011,01000019] [ 0. 8.0 ] 1011:0019 Rev 0x41  Class 2.0.0
   CmdStatus 02800007:
        CMD: IO MEM MASTER
     Status: B2B DEVSEL-MED
        Region 0: IO f880, size 0080
        Region 1: MEM 32bit at 0x05000000, size 0x00000400

  [010010ea,01005000] [ 0.10.0 ] 10ea:5000 Rev 0x01  Class 3.0.0
   CmdStatus 02000007:
        CMD: IO MEM MASTER
     Status: DEVSEL-MED
        Region 0: MEM 32bit at 0x06000000, size 0x01000000

  [010010ea,01005050] [ 0.10.1 ] 10ea:5050 Rev 0x01  Class 4.1.0
   CmdStatus 02000007:
        CMD: IO MEM MASTER
     Status: DEVSEL-MED
        Region 0: MEM 32bit at 0x07010000, size 0x00001000
        Region 1: IO f000, size 0100

  [010010b9,01005229] [ 0.16.0 ] 10b9:5229 Rev 0xc1  Class 1.1.250
   CmdStatus 02800005:
        CMD: IO MASTER
     Status: B2B DEVSEL-MED
        Region 4: IO ecf0, size 0010

   ->  [03000000,03000001]
   ->  [03000000,03000001]
  [010010b9,01007101] [ 0.17.0 ] 10b9:7101 Rev 0x00  Class 6.128.0
   CmdStatus 02800001:
        CMD: IO
     Status: B2B DEVSEL-MED
        Region 0: IO e8c0, size 0040
        Region 1: IO e8a0, size 0020

  [010010b9,01005237] [ 0.20.0 ] 10b9:5237 Rev 0x03  Class 12.3.16
   CmdStatus 02800006:
        CMD: MEM MASTER
     Status: B2B DEVSEL-MED
        Region 0: MEM 32bit at 0x07011000, size 0x00001000

bus: cpu on memory 00000000..80000000
  [03000000,03000002] intel21285, 1 IO regions
   Region 0 - 42000000, size 00100000, mulitplier 0001
>
Name
display — Display and image on console.
Synopsis
console [-d, --device device] [-x x] [-y y] [-w, --width width] [-h, --height height] [--delay time] [--help] [--version] file...
Options
-d, --deviceconsole device on which to plot image.
-xx co-ordinate to place image on screen.
-yy co-ordinate to place image on screen.
-w, --widthwidth of image on screen.
-h, --heightheight of image on screen.
--delaytime to delay between displaying each image.
--helpdisplay short helptext and exit
--versiondisplay commands version and exit
Description
This command displays an image on screen if it is one of the recognised formats. The currently supported image formats are BMP and PGM.
Example 32. Using the display command
This shows using the console command on the EB2410ITX to find a suitable output device and then using that driver to display a bitmap file from a tftp server.
>console -d
(rw--)  (s3c2410_serial1)
(-w-a)  s3c2410x-video
(r---)  usbkbd
(rw--)  multi
(rw--)  null
(-w--)  all-wr
(r---)  all-rd
(rw--)  serial
(rw--)  (s3c2410_serial2)
(rw--)  (s3c2410_serial0)
>display -d s3c2410x-video (tftpboot)logo.bmp
>
Simtec logo displayed with the display command on an EB2410ITX video console
Name
help — Display help on built in commands
Synopsis
help [command]
Description
Without a parameter this command lists the in-built
commands understood by the shell. Specifying a command name
prints a brief help message for that command which is
typically the same as using the --help
option.
Example 33. Using the help command
This shows the help command being used to get help on
the help command itself, it then shows obtaining help on
the sh command and obtaining the same
information with the --help
option.
>help
Internal commands are:
sh           autoboot     sbcd         bast-hdlcd   pic-wr       pic-rd
bast-at2     bast-at      dmcfg-rd     dmcfg-wr     pmu          shadow
mii          ifconfig     set          [            test         console
display      file         hwinfo       wrout        version      nvclear
nvunset      nvsave       nvshow       nvset        uname        sum
tasks        sleep        showhz       sysmsg       setopt       showargs
setargs      reset        memset       meminfo      peek         poke
modules      ls           lsfs         help         echo         dumpfile
dump         cat          cp           cd           pwd          boot
load         history      vtp5         vtp4         vtp3         vtp2
vtp1         sysspeed     settime      setdate      devls        date

Use:
  help <command> to get brief explanation
  <command> --help for command usage (if available)
>help help
Help on help:
Lists available commands, Optional arg gives help on specific command.
Please report bugs to <support@simtec.co.uk>
>help sh
Help on sh:
Usage: sh [OPTION] [FILE]
start a shell.

  -i              start an interactive shell
       --help     display this help and exit
       --version  output version information and exit


Please report bugs to <support@simtec.co.uk>
>sh --help
Usage: sh [OPTION] [FILE]
start a shell.

  -i              start an interactive shell
       --help     display this help and exit
       --version  output version information and exit

Please report bugs to <support@simtec.co.uk>
>
The Example 3.5, “Getting help on the uname command” is another example of using the help command.
Name
history — Lists the commands in the command line history.
Synopsis
history
Description
Lists the commands in the command line history. Each command is numbered in the list. The number of commands kept in the history is set with the shell.hist non-volatile variable.
Commands are accessed in the history by using the up and down arrows. The command may be edited in place and then executed as with any other command line as if typed in.
Name
hwinfo — Print hardware information.
Synopsis
hwinfo [[-a] | [-u]] [--help] [--version]
Name
man — Manual page display
Synopsis
man {command}
Description
This command displays the manual page for a specified command. The manual pages are generated directly from the ABLE reference documentation and formatted for 80 column output. The output is stored on an ABLE accessible filesystem and and displayed with the ABLE pager. The pager output can be aborted with q.
Example 36. Using the man command
This example shows the man command used to get the manual page of the file command.
FILE(1)                   File manipulation commands                   FILE(1)


NAME
       file - Tests each argument in an attempt to classify it.

SYNOPSIS
       file [-i, --mime] [--help] [--version] file...

OPTIONS
       -i, --mime Causes the file command to output mime type strings rather
       than the more traditional human readable ones.

       --help display short helptext and exit

       --version display commands version and exit

DESCRIPTION
       The file command examines a given file and tries to determine the files
       type. The underlying detection code is the same as that used by ABLE
       when determining how to load and execute files, this is useful if the
       user wishes to check ABLE is correctly determining a files type.
       Example 48. Using the file command to determine filetypes.
--More--
Note
This command is only available on a limited number of platforms due to the size of the manual files required.Name
modules — List ABLE modules
Synopsis
modules
Description
Lists all the ABLE modules within a particular build. ABLE is constructed using a small section of “head” or initialisation code and a number of modules. Each module provides a specific piece of functionality to the system e.g. the cmd_time module provides the time command to the shell.
The modules are loaded according to their priority, the lowest (most important) priority first rising to the highest (lowest importance). This priority system ensures a fixed load order so facilities and drivers are available in the appropriate sequence.
Example 38. Using the modules command
>modules
current modules:
 cmd_time, priority=0x100
 cmd_devls, priority=0x100
 cmd_setdate, priority=0x100
 ax88796, priority=0x50000
 dm9000, priority=0x50000
 simtec_ide, priority=0x50000
 bbd2016a_ide, priority=0x50000
 anubis_bus, priority=0x65000
 bast_bus, priority=0x65000
 osiris_bus, priority=0x65000
 smdk2440_bus, priority=0x65000
 vr1000_bus, priority=0x65000
 samsung_s3c2410x, priority=0x65100
 dev_24cxx, priority=0x65801
 nvram_init, priority=0x65880
 s3c2410x_timer, priority=0x71000
 hztimer, priority=0xa0000
 cmd_sysspeed, priority=0xa6000
 romfs, priority=0xa7000
 serial_u16550, priority=0xa8800
 serial_s3c2410, priority=0xa8800
 serial_console, priority=0xa8a00
 allrd_console, priority=0xa8a00
 allwr_console, priority=0xa8a00
 null_console, priority=0xa8a00
 multi_console, priority=0xa8a00
 usbkbd, priority=0xa8a00
 ps2kbd_serpic, priority=0xa8a00
 s3cvid_console, priority=0xa8a00
 sm501vid_console, priority=0xa8a00
 console, priority=0xa8a01
 draminit, priority=0xa8a05
 drv_pmu_bast, priority=0xa9100
 usb_core, priority=0xa9800
 usb_ohci, priority=0xa9802
 announce, priority=0xa9fff
 confs, priority=0xaa001
 iso9660fs, priority=0xaa002
 ffs, priority=0xaa002
 ext2fs, priority=0xaa002
 jffs2, priority=0xaa002
 tftpboot, priority=0xaa002
 char_code, priority=0xaa003
 ide, priority=0xb0000
 ide_disc_drv, priority=0xb0001
 ide_cdrom_drv, priority=0xb0001
 rom, priority=0xb1000
 net_dm9000, priority=0xd1001
 netudp, priority=0xd1002
 netipv4, priority=0xd1002
 netif, priority=0xd1002
 net_isa_ne2k, priority=0xd1002
 net_ax88796, priority=0xd1002
 net_test1, priority=0xd1003
 cyclone_code, priority=0xd1101
 sh_osloader, priority=0xe0000
 app1_osloader, priority=0xe0000
 lzw_osloader, priority=0xe0000
 netbsd_osloader, priority=0xe0000
 linux_osloader, priority=0xe0000
 srec_osloader, priority=0xe0000
 zlib_osloader, priority=0xe0000
 tmp101, priority=0xe8000
 cmdload, priority=0xf0000
 cmdboot, priority=0xf0000
 cmd_cd, priority=0xf0000
 cmd_cp, priority=0xf0000
 cmd_cat, priority=0xf0000
 cmd_dump, priority=0xf0000
 cmd_echo, priority=0xf0000
 cmd_help, priority=0xf0000
 cmd_lsfs, priority=0xf0000
 cmd_ls, priority=0xf0000
 cmd_modules, priority=0xf0000
 cmd_poke, priority=0xf0000
 cmd_meminfo, priority=0xf0000
 cmd_memset, priority=0xf0000
 cmd_reset, priority=0xf0000
 cmd_sleep, priority=0xf0000
 cmd_wrout, priority=0xf0000
 cmd_hwinfo, priority=0xf0000
 cmd_file, priority=0xf0000
 cmd_display, priority=0xf0000
 cmd_cons, priority=0xf0000
 cmd_test, priority=0xf0000
 cmd_set, priority=0xf0000
 cmd_ifconfig, priority=0xf0000
 cmd_mii, priority=0xf0000
 cmd_autoboot, priority=0xf0001
 shell, priority=0xf0002
>
Name
pmu — Power management control
Synopsis
pmu [-o] [-r] [-w {state} ] [-n {state}] [-s] [-a] [-l]
Name
sbcd — Manipulates the board configuration data.
Synopsis
sbcd [-l, --load {file}] [-s, --show] [-d, --drivers] [-h, --help]
Name
setdate — Sets the date in the real time clock
Synopsis
setdate {day} {month} {year}
Options
dayday of month to set
monthmonth to set
yearyear to set, two digit values will have 2000 added
Description
This command allows the date to be set in the real time clock. The real time clock is typically battery backed and the settings are retained across reboots.
Example 39. Using the setdate command to set the real time clock
>setdate 1 2 3
setdate: assuming year value is offset from 2000
>date
Sat Feb 01 17:59:52 2003
>reset
selected all-wr for console write
selected all-rd for console read
DRAM: 128 Mb (134217728 bytes)
BAST: PMU version 1.02, ID 00:01:3d:00:01:6a
ABLE 2.20 Copyright 2001-2005,2006 Simtec Electronics
hdb: ATAPI CDROM: TOSHIBA CD-ROM XM-7002B PIO mode 4
hdc: FUJITSU MHF2043AT: ATA PIO mode 4
hdc:Diagnosing disc drive: ok
(hdc) 4GB
(hdb) Drive Empty
DM9000: dm0: r1, 00:01:3d:00:01:6a int phy, link ok, 100Mbit full duplex
NE2000: ne0: ISA/Generic, 00:01:3d:00:01:6b
ne0: PHY 0180:bb10, state 7869, LPA 45e1,0007
ne0: starting PHY reset (264)
TMP101: not detected
sys.autoshadow unset, automatically shadowing
>date
Sat Feb 01 18:00:04 2003
>setdate 10 3 2006
>date
Fri Mar 10 18:00:33 2006
>
Name
setopt — Sets device options.
Synopsis
setopt {device} {options}
Description
This command allows device options to be altered, typically baud rates and data formats on character devices.
The device which options are applied to is typically a
serial port. The console command can be used
to obtain a list of appropriate devices with the
-d option.
The options are in the form:
baud,data-format
The baud rate is a simple numeric value e.g. 115200 or
19200. The data format is specified as three single
character values. The first denotes the number of data bits,
typically eight or seven. The second sets the parity type
one of none (n), odd
(o) or even
(e). The third is the number of stop
bits either one or two.
The initial port options are detailed in Section 5.2, “Setting parameters on serial drivers”.
Example 40. Using the setopt command to alter serial port options.
This example shows the setopt command altering the baud rate of the second s3c2410 serial port to 19600.
>console -d
(-w-a)  s3c2410x-video
(r---)  usbkbd
(rw--)  multi
(rw--)  null
(-w--)  all-wr
(r---)  all-rd
(rw--)  serial
(rw--)  (s3c2410_serial2)
(rw--)  (s3c2410_serial1)
(rw--)  (s3c2410_serial0)
(rw--)  (u16550_serial1)
(rw--)  (u16550_serial0)
>setopt (s3c2410_serial1) 19600,8n1
>
Name
settime — Sets the real time clock
Synopsis
settime {hour} {minute} {second}
Description
This command allows the time to be set in the real time clock. The real time clock is typically battery backed and the settings are retained across reboots.
Example 41. Using the settime command to set the real time clock
This example shows the time being altered, the system reset and the retention and correct update of the time across the reset.
>date
Wed Mar 22 16:37:11 2006
>settime 1 2 3
>date
Wed Mar 22 01:02:03 2006
>reset
selected all-wr for console write
selected all-rd for console read
DRAM: 128 Mb (134217728 bytes)
BAST: PMU version 1.02, ID 00:01:3d:00:01:6a
ABLE 2.21r1 Copyright 2001-2005,2006 Simtec Electronics
hdb: ATAPI CDROM: TOSHIBA CD-ROM XM-7002B PIO mode 4
hdc: FUJITSU MHF2043AT: ATA PIO mode 4
hdc:Diagnosing disc drive: ok
(hdc) 4GB
(hdb) Drive Empty
DM9000: dm0: r1, 00:01:3d:00:01:6a int phy, link ok, 100Mbit full duplex
NE2000: ne0: ISA/Generic, 00:01:3d:00:01:6b
ne0: PHY 0180:bb10, state 7869, LPA 45e1,0007
ne0: starting PHY reset (262)
TMP101: not detected
sys.autoshadow unset, automatically shadowing
>date
Wed Mar 22 01:02:26 2006
>settime 16 40 0
>date
Wed Mar 22 16:40:00 2006
>
Name
shadow — Moves ABLE into RAM
Synopsis
shadow
Description
Moves ABLE into RAM. This allows systems where ABLE executes directly from flash memory to move ABLE into RAM where it will execute faster, this is also required if the underlying flash memory is to be reprogrammed e.g. when upgrading ABLE
This command is largely deprecated and is generally now only used on the EB7500ATX. Most platforms are running ABLE shadowed as most current designs do not have directly mapped memory to execute from.
Name
showhz — Shows how long a system has been running
Synopsis
showhz
Description
ABLE maintains an internal timer which increments 100 times a second. The timer is started from 0 and hence gives an indication of the amount of time since the last reset.
This command displays the value of the system timer in hexadecimal, the value is also converted into seconds for convenience.
Example 42. Using the showhz command
>showhz; sleep 10; showhz
HZ: be36 (486 seconds)
HZ: c227 (497 seconds)
>showhz
HZ: 1f6b9 (1286 seconds)
>
Name
sysmsg — Show system messages.
Synopsis
sysmsg
Description
Displays the system message history buffer. This buffer contains all the messages ABLE has produced. Not all of these messages may have been output to the console, the console.level variable and the console command control which messages are displayed and which are simply placed in the message buffer.
Example 43. Displaying the system messages after a default boot
The system message log contains more information than will normally be output to the console, these messages can be useful for discovering problems.
selected all-wr for console write
selected all-rd for console read
DRAM: 128 Mb (134217728 bytes)
BAST: PMU version 1.02, ID 00:01:3d:00:01:6a
ABLE 2.20 Copyright 2001-2005,2006 Simtec Electronics
hdb: ATAPI CDROM: TOSHIBA CD-ROM XM-7002B PIO mode 4
hdc: FUJITSU MHF2043AT: ATA PIO mode 4
hdc:Diagnosing disc drive: ok
(hdc) 4GB
(hd0) on ((hdc1):ext2)
(hdb) Drive Empty
DM9000: dm0: r1, 00:01:3d:00:01:6a int phy, link ok, 100Mbit full duplex
NE2000: ne0: ISA/Generic, 00:01:3d:00:01:6b
TMP101: not detected
sys.autoshadow unset, automatically shadowing
>sysmsg
1: dcc: status 20000000, read 80f403c8
2: low level serial 00000000
3: log level is now 1
4: ABLE: 2.20 (s3c2410x) (vince@gerald) Thu Feb 16 14:47:40 GMT 2006
5: Processor: Samsung S3C2410A (arm920)
6: System: Machine bast/s3c2410x, Linux id 0x014b
7: S3C2410X RTC: 13:49:57, 03/01/2003
8: (s3c2410x) character device
9: NAND: configured boot slot is 0 (card slot)
10: NAND device 0: Samsung K9F1208u0a [131072,32,512]
11: (flash0) on (nand0p1)
12: (flash1) on ((nand0p2):jffs2)
13: EEPROM: 24cXX, 1024 bytes, single byte addressed, UID unset
14: (nvram0) on (24cxx0p1)
15: sys.speed is unset, Setting CPU Speed to 266MHz
16: (u16550_serial0) aliased to (char0)
17: (u16550_serial1) aliased to (char1)
18: s3c2410_serial: 115200, 8n1, 16 byte fifo on, u clock
19: (s3c2410_serial0) aliased to (char2)
20: s3c2410_serial: 115200, 8n1, 16 byte fifo on, u clock
21: (s3c2410_serial1) aliased to (char3)
22: s3c2410_serial: 115200, 8n1, 16 byte fifo on, u clock
23: (s3c2410_serial2) aliased to (char4)
24: all-wr: adding console 'serial'
25: all-wr: adding console 'null'
26: no configuration, defaulting to VGA
27: Chrontel CH7006 detected
28: screen mode is 640x480, ?Hz, ?Hz HSync
29: video: video size 300K
30: s3c-fb: VClk=22166666 HZ
31: configuring ch7006: vga
32: all-wr: adding console 's3c2410x-video'
33: failed to find SM501 device
34: no console level set, setting 6
35: selected all-wr for console write
36: selected all-rd for console read
37: DRAM: 128 Mb (134217728 bytes)
38: BAST: PMU version 1.02, ID 00:01:3d:00:01:6a
39: usb.enable not set, setting 1
40: usb.hubdepth not set, setting 2
41: new hc e036d1b4
42: starting hc e036d1b4
43: ABLE 2.20 Copyright 2001-2005,2006 Simtec Electronics
44: hdb: ATAPI CDROM: TOSHIBA CD-ROM XM-7002B PIO mode 4
45: hdc: FUJITSU MHF2043AT: ATA PIO mode 4
46: hdc:Diagnosing disc drive: ok
47: (hdc) 4GB
48: (hd0) on ((hdc1):ext2)
49: (hdb) Drive Empty
50: DM9000: dm0: r1, 00:01:3d:00:01:6a int phy, link ok, 100Mbit full duplex
51: NE2000: ne0: ISA/Generic, 00:01:3d:00:01:6b
52: ne0: PHY 0180:bb10, state 7849, LPA 0000,0004
53: ne0: starting PHY reset (238)
54: TMP101: not detected
55: sys.autoshadow unset, automatically shadowing
56: >ne0: bringing PHY up (489)
57: sysmsg
>
Name
sysspeed — Sets the system clockspeed
Synopsis
sysspeed [speed]
Description
Displays possible speeds with no parameters or sets the system speed in MHz.
Example 44. Using the syspeed command on a EB2410ITX
This shows the sysspeed command being used to list possible values with the * indicating the current selected speed. The speed is changed to 226 MHz from 266MHz and redisplayed.
>sysspeed
    34 MHz        45 MHz        51 MHz        48 MHz        56 MHz
    68 MHz        79 MHz        85 MHz        90 MHz       101 MHz
   113 MHz       118 MHz       124 MHz       135 MHz       147 MHz
   152 MHz       158 MHz       170 MHz       180 MHz       186 MHz
   192 MHz       203 MHz       210 MHz       226 MHz    *  266 MHz
   268 MHz       270 MHz
>sysspeed 226
Setting CPU Speed to 226MHz
CPU Speed successfully changed
>sysspeed
    34 MHz        45 MHz        51 MHz        48 MHz        56 MHz
    68 MHz        79 MHz        85 MHz        90 MHz       101 MHz
   113 MHz       118 MHz       124 MHz       135 MHz       147 MHz
   152 MHz       158 MHz       170 MHz       180 MHz       186 MHz
   192 MHz       203 MHz       210 MHz    *  226 MHz       266 MHz
   268 MHz       270 MHz
>
Name
tasks — Displays task threads currently running on system.
Synopsis
tasks
Description
ABLE runs several threads to control various hardware devices. This command displays the currently running threads.
The information is presented in a tabular form. The columns are:
| Task name and address |
| Priority of execution |
| Current state |
| Register context block |
| Time thread was last scheduled |
The scheduling for the threads is a simple “round robin” method which suffices for ABLE requirements.
Example 45. Using the tasks command
This example shows the tasks command when run on a EB2410ITX. The showhz command is used to show the current system time which is the same as used in the “Last Run” column. It shows the Ethernet PHY control task, the USB host controller driver, the reaper task to clean up after other tasks, the init task which starts the system and the main task which typically runs the autoboot or interactive shell.
>showhz ; tasks ; showhz
HZ: 13e6034 (208650 seconds)
                 Task Priority  State   Regs     Last Run
--------------------- --------  ------- -------- --------
 ax88796-mii e0369794 00000000  r---y-  e03697d0 013e604e
      usb-hc e036c934 00100000  r---y-  e036c970 013e6057
      reaper e03c1a54 00000100  r---y-  e03c1a90 013e6060
        init e03c7de4 10000000  r-----  e03c7e20 013e6068
        main e03c7f34 7f000000  r-----  e03c7f70 013e6071
HZ: 13e607a (208651 seconds)
>
Name
uname — Print system identification
Synopsis
uname [-a, --all] [-s, --kernel-name] [-n, --nodename] [-r, --kernel-release] [-v, --kernel-version] [-m, --machine] [-o, --operating-system] [--help] [--version]
Options
-a, --allprint all information, in the following order:
-s, --kernel-nameprint the kernel name
-n, --nodenameprint the network node hostname
-r, --kernel-releaseprint the kernel release
-v, --kernel-versionprint the kernel version
-m, --machineprint the machine hardware name
-o, --operating-systemprint the operating system
--helpdisplay this help and exit
--versionoutput version information and exit
Description
Print system identification, this command is practically identical in use to equivalent commands under UNIX®.
The uname command prints information
about the machine and operating system it is run on. If no
options are given the -s option is
assumed.
The information printed is always in the order
kernel-name, nodename,
kernel-release, machine
and operating system. The values displayed
may contain spaces or punctuation.
Example 46. Using the uname command on the EB2410ITX
>uname
ABLE
>uname -a
ABLE unknown 2.21 #1 Mon Mar 13 12:19:51 GMT 2006 s3c2410x ABLE
>uname -r
2.21
>uname -v
#1 Mon Mar 13 12:19:51 GMT 2006
>
Name
version — Display ABLE shell version
Synopsis
version
Description
Displays the version number and build information of the currently executing instance of ABLE. This is the same text which is output during the boot process.
The information provided by this command is also available from the uname command.
Example 47. Using the version command
>version
ABLE 2.20 Copyright 2001-2005,2006 Simtec Electronics
>
These are the commands which can be used to perform operations related to the ABLE shell.
Name
echo — Output some text to standard output
Synopsis
echo [-n] [-e] {text}
Options
-ndo not output the trailing newline
-eenable interpretation of the backslash-escaped characters
texttext to display
Description
This command is used to display text on the output console. One use is in scripts to indicate what actions are being performed.
If the -e option is used, the following sequences are recognised:
Table 7. Escaped echo characters
| Character | Result |
|---|---|
| \0NNN | the character whose ASCII code is NNN (octal) |
| \\ | backslash |
| \a | alert (BEL) |
| \b | backspace |
| \c | suppress trailing newline (same as the -n option) |
| \f | form feed |
| \n | new line |
| \r | carriage return |
| \t | horizontal tab |
| \v | vertical tab |
Example 48. Using the echo command
>echo pepper;echo fish
pepper
fish
>echo -n pepper;echo fish
pepperfish
>
Name
exit — Exit ABLE shell
Synopsis
exit [status]
Description
Cause the shell to exit with a specified status. If the status code is omitted the exit status is that of the last command executed.
If the initial shell is exited any additional modules with lower priority will be executed, ultimately if no further modules are available the system will halt.
Name
read — Reads a line of input into shell variables
Synopsis
read [-d {delimiter}] [-e] [-n {number}] [-p {prompt}] [-s] [-t {timeout}] [-u {file}] {variable...}
Options
-ddelimiterThe delimiter is a single character which is used to terminate the input line the default if this option is not given is newline.
-eIf the input is not coming from a file (
-uisn't used) the input will be read with a line editor. This line editor is the same as the main shell but with no history.-nnumberThe command exits after reading the specified number of characters.
-ppromptThe prompt will be output before starting to accept input. The prompt is only displayed if
-uis not being used.-sIf the
-uis not being used characters entered are usually displayed, this switch inhibits this display. This can be used for password entry.-ttimeoutthis stops reading input after the timeout and exits with a non zero exit code. The option has no effect if the
-uoption is being used.-ufdInstead of reading input from the console read from the given file descriptor.
variableThe names of the variables to place the read text into. If no names are supplied the input is put into the
REPLYvariable.
Description
One line is read from the console, or from the file descriptor supplied as an argument to the -u option, and the first word is assigned to the first variable name, the second word to the second name, and so on, with leftover words and their intervening separators assigned to the last name. If there are fewer words read from the input stream than names, the remaining names are assigned empty values.
The characters in IFS are used to
split the line into words unless the delimiter switch is
used.
The return code is zero, unless end-of-file is
encountered, read times out, or an invalid file is
supplied as the argument to -u.
Example 49. Using the read command
This example shows the use to the read command in several ways. Firstly reading simple text without a prompt and then with a long prompt.
>read
some text
>echo $REPLY
some text
>read -p "a long prompt $"
a long prompt $some text with a long prompt
>echo $REPLY
some text with a long prompt
>
This shows reading values into a specified variable
and how the REPLY variable is unaffected.
>REPLY="no reply"
>read -p $ VARIABLE
$some text with a prompt in VARIABLE
>echo $VARIABLE
some text with a prompt in VARIABLE
>echo $REPLY
no reply
>
This shows the use of the silent switch to suppress echoing of output.
>read -s VARIABLE

>echo $VARIABLE
some text in VARIABLE with silent enabled
>
This shows the use of the delimiter and timeout options to read a preset number of characters and perform a read within a set amount of time.
>read -n 5 VARIABLE
12345>echo $VARIABLE
12345
>read -d 9 VARIABLE
this text continues until a 9>echo $VARIABLE
this text continues until a
>echo $?
0
>read -t 3 VARIABLE
>echo $?
1
>echo $VARIABLE
this text continues until a
>
Name
sh — Start a new ABLE shell
Synopsis
sh [-x] [-e] [-v] [-i] [--help] [--version]
Options
-xDisplay the command to be executed with its variables expanded.
-eExit immediately if a command fails
-vDisplay lines of input as they are read.
-iStart an interactive shell
--helpDisplay short helptext and exit
--versionDisplay commands version and exit
Description
This command starts a new ABLE shell, for full information on using the shell refer to Chapter 3, Command Line Interface. The newly created shell environment is separate from the invoking shell, variables from the parent are not available and upon exit any variables set within the shell are lost.
Example 50. Subshell variable scope
This example shows setting variables in the outer shell and in the subshell and their scope.
>echo ${FOO}

>echo ${BAR}

>FOO="hello and goodbye"
>BAR="goodbye and hello"
>sh
>echo ${FOO}

>echo ${BAR}

>BAR="something else"
>FOO="entirely"
>echo ${FOO} ${BAR}
something else entirely
>exit
>echo ${FOO}
hello and goodbye
>echo ${BAR}
goodbye and hello
>
The -x, -e and
-v switches control the shells overall
behaviour, these variables are accessed from the shell using
the special
variable $_.
Name
sleep — Delay for a specified amount of time
Synopsis
sleep {time}
Description
This command is used to pause execution for a given length of time. The time given must be a simple integer number of seconds.
Example 51. Using the sleep command to delay execution
>date ; sleep 15 ; date ; sleep 9 ; date ; sleep 292 ; date
Fri Jan 05 04:25:51 2003
Fri Jan 05 04:26:06 2003
Fri Jan 05 04:26:15 2003
Fri Jan 05 04:31:07 2003
>
Name
test — Performs test operations
Synopsis
test [--help] [--version] expression
Options
--helpDisplay this help and exit
--versionOutput version information and exit
expressionExpression to evaluate.
Description
Exit with the status determined by the expression (shown in Table 8, “Possible test expressions”).
An omitted expression defaults to false. Otherwise, the expression is evaluated to a true or false result and sets exit status accordingly.
An alias is provided so this command can be called as [ this gives a more familiar way to use this command.
For the tests which check for a file having UNIX® read or write permissions ABLE assumes the root (UID 0 and GID 0) superuser is being used.
Table 8. Possible test expressions
| Test | Result is true if |
|---|---|
( expression ) | expression is
true |
! expression | expression is
false |
expression1 -a
expression2 | both expression1 and
expression2 are
true |
expression1 -o
expression2 | either expression1 or
expression2 is true |
-n string | the length of string
is nonzero |
string | equivalent to -n
string |
-z string | the length of string
is zero |
string1 =
string2 | the strings are equal |
string1 !=
string2 | the strings are not equal |
integer1 -eq
integer2 | integer1 is equal to
integer2 |
integer1 -ge
integer2 | integer1 is greater
than or equal to
integer2 |
integer1 -gt
integer2 | integer1 is greater
than integer2 |
integer1 -le
integer2 | integer1 is less than
or equal to
integer2 |
integer1 -lt
integer2 | integer1 is less than
integer2 |
integer1 -ne
integer2 | integer1 is not equal
to integer2 |
file1 -ef
file2 | file1 and
file2 have the same device
and inode numbers |
file1 -nt
file2 | file1 is newer
(modification date) than
file2 |
file1 -ot
file2 | file1 is older than
file2 |
-b file | file exists and is
block special |
-c file | file exists and is
character special |
-d file | file exists and is a
directory |
-e file | file exists |
-f file | file exists and is a
regular file |
-g file | file exists and is
set-group-ID |
-G file | file exists and is
owned by the effective group ID |
-h file | file exists and is a
symbolic link (same as -L) |
-k file | file exists and has
its sticky bit set |
-L file | file exists and is a
symbolic link (same as -h) |
-O file | file exists and is
owned by the effective user ID |
-p file | file exists and is a
named pipe |
-r file | file exists and read
permission is granted |
-s file | file exists and has a
size greater than zero |
-S file | file exists and is a
socket |
-t fd | file descriptor fd is
opened on a terminal |
-u file | file exists and its
set-user-ID bit is set |
-w file | file exists and write
permission is granted |
-x file | file exists and
execute (or search) permission is granted |
Except for -h and -L,
all file-related tests dereference symbolic links. Beware
that parentheses need to be escaped (e.g., by back-slashes)
for shells.
Example 52. Performing assorted tests
This example shows the use of the test command with various expressions. Each test uses “&& echo true” to make it clear when the expression returns a true (zero) exit status.
>test ! ( 1 -ge 0 ) && echo true
>echo $?
1
>test ( 1 -ge 0 ) && echo true
true
>echo $?
0
>test ! ( 1 -ge 0 ) && echo true
>test ! ( 0 -ge 1 ) && echo true
true
>test -f (hd0)/etc/services && echo true
true
>test -f (hd0)/etc/services -a ( 1 -ge 0 ) && echo true
true
>test -f (hd0)/etc/services -a ( 1 -ge 2 ) && echo true
>test -f (hd0)/etc/services -o ( 1 -ge 2 ) && echo true
true
>test -n "foo" && echo true
true
>test -n "" && echo true
>test -z "foo" && echo true
>test "foo" = "foo" && echo true
true
>test "foo" = "bar" && echo true
>test "foo" != "bar" && echo true
true
>test 1 -eq 2 && echo true
>test 1 -eq 1 && echo true
true
>test 1 -ge 0 && echo true
true
>test 1 -ge 1 && echo true
true
>test 1 -ge 2 && echo true
>test 1 -gt 1 && echo true
>test 1 -le 2 && echo true
true
>test 1 -le 1 && echo true
true
>test 1 -le 0 && echo true
>test 1 -lt 1 && echo true
>test 1 -ne 1 && echo true
>test 1 -ne 0 && echo true
true
>test -f (hd0)/etc/services
>test -f (hd0)/etc/services && echo true
true
>test -d (hd0)/etc/services && echo true
>test -d (hd0)/etc && echo true
true
>test -b (hd0)/etc/services && echo true
>test -b (hd0)/dev/hda && echo true
true
>test -c (hd0)/dev/hda && echo true
test -c (hd0)/dev/tty  && echo true
true
>
These are the commands for controlling the network interfaces.
Name
ifconfig — Network device configuration and selection
Synopsis
ifconfig [-a] [-s] [--help] [--version] {interface} [address] [netmask{address}] [gateway{address}] [tftpserver{address}
] [[up] | [down]]
Options
-aDisplays information about all available interfaces
-sChanges output to short format
--helpDisplay commands syntax then exits
--versionDisplays commands version then exits
addressAddress to assign to interface e.g. 192.168.7.101
interfaceName e.g. ne0 or de0 unless
-ais usednetmaskNetmask to assign to interface e.g. 255.255.255.0
gatewayDefault gateway to assign to interface e.g. 192.168.7.1
tftpserverTFTP server address to use e.g. 192.168.7.10
upSelects the interface as operational and the default.
downDisables the interface.
Description
This command allows network interfaces to be manually configured and different interfaces to be selected.
Normally ABLE will use DHCP on the default interface
when retrieving files over tftp, the default interface may be
changed with this command by using just
the up flag (see Example 53, “Using the ifconfig
command to select default interface”)
By using the other parameters the interface may be configured with IPv4 addresses. Configuring in this way removes the requirement of using a DHCP server.
Example 53. Using the ifconfig command to select default interface
>ifconfig -a
dm0       HWaddr 00:01:3d:20:20:20

ne0       HWaddr 00:01:3d:ff:ff:00

>ifconfig dm0 up
looking for net.dm0
net.dm0:selected as boot interface
>ifconfig ne0 up
looking for net.ne0
net.ne0:selected as boot interface
>
Example 54. Using the ifconfig command to configure a fixed address
This example shows the first davicom interface (dm0) being configured with the IP protocol address 192.168.7.101 with a netmast of 255.255.255.0 and to use the tftpserver 192.168.7.10 no default gateway has been specified.
>ifconfig dm0 192.168.7.101 netmask 255.255.255.0 tftpserver 192.168.7.10 up
looking for net.dm0
net.dm0:selected as boot interface
>
Name
mii — MII phy control
Synopsis
mii {-d, --dev
device} [-p, --phy
address] [-s, --show] [-r, --read
address] [-w, --write
address
value] [-h, --help]
Options
-d, --devPerforms operation on the specified device
-p, --phySpecify phy address on device
-s, --showShow all registers for phy
-r, --readRead mii register
-w, --writeWrite mii register
-h, --helpDisplay short help message
Description
Gives control of MII phy parameters on supported network controllers.
Example 55. Using the mii command to show all the registers in a phy
>mii -d ne0 -s
 [00] = 3000  [01] = 7849  [02] = 0180  [03] = bb10
 [04] = 01e1  [05] = 0000  [06] = 0004  [07] = 2001
 [08] = 0000  [09] = 0000  [10] = 0000  [11] = 0000
 [12] = 0000  [13] = 0000  [14] = 0000  [15] = 0000
 [16] = 0000  [17] = 0283  [18] = 11dd  [19] = 0000
 [20] = 0000  [21] = 5256  [22] = 07ec  [23] = 4001
 [24] = 0800  [25] = 2041  [26] = 07cf  [27] = 1c11
 [28] = 0010  [29] = 1000  [30] = 0000  [31] = 0001
>
These are the file commands are available from the shell command line of ABLE from version 2.20 and later.
Name
cd — Change present working directory
Synopsis
cd [directory]
Description
This changes the present working directory of the shell to the specified directory, the change may be relative to the current directory or an absolute path.
Example 56. Using the cd and ls commands to navigate a filesystem
This shows using the cd command to change into the boot directory of the first hard drive and then perform a relative move into the var directory.
>cd (hd0)/boot
>ls
config-2.6.13-simtec1
vmlinuz-2.6.13-simtec1
>cd ../var
>ls
lib
cache
backups
local
lock
log
run
spool
tmp
opt
mail
>
Name
ls — List files in directory
Synopsis
ls [-l] [-a] [directory]
Options
-lLong listing giving more information.
-aListing includes all files.
directoryDirectory to list.
Description
This command produces a list of all the files in a given
directory, if no directory is specified then the present working
directory is shown. Example 56, “Using the cd and ls commands to navigate a filesystem”
shows the listing of the PWD.
Listing the “root” directory (ls /) is the same as the lsfs command and lists all the available filesystems.
Example 57. Using the ls command
This shows a simple directory listing of the first hard disc partition with a filesystem.
>ls (hd0)
lost+found
etc
media
var
usr
bin
boot
dev
home
lib
mnt
proc
root
sbin
tmp
sys
srv
opt
>
This shows a detailed directory listing of the first hard disc partition with a filesystem.
>ls -l -a (hd0)
drwxr-xr-x   22 0 0     4096 .
drwxr-xr-x   22 0 0     4096 ..
drwxr-xr-x    2 0 0    49152 lost+found
drwxr-xr-x   73 0 0     4096 etc
drwxr-xr-x    2 0 0     4096 media
drwxr-xr-x   13 0 0     4096 var
drwxr-xr-x   12 0 0     4096 usr
drwxr-xr-x    2 0 0     4096 bin
drwxr-xr-x    2 0 0     4096 boot
drwxr-xr-x    7 0 0    24576 dev
drwxrwxr-x    5 0 50    4096 home
drwxr-xr-x    9 0 0     4096 lib
drwxr-xr-x    2 0 0     4096 mnt
drwxr-xr-x    2 0 0     4096 proc
drwxr-xr-x    5 0 0     4096 root
drwxr-xr-x    2 0 0     4096 sbin
drwxrwxrwx    4 0 0     4096 tmp
drwxr-xr-x    2 0 0     4096 sys
drwxr-xr-x    2 0 0     4096 srv
drwxr-xr-x    2 0 0     4096 opt
>
This shows the PWD being changed and the ls command used to display the directory contents.
>cd (hd0)
>ls -l -a
drwxr-xr-x   22 0 0     4096 .
drwxr-xr-x   22 0 0     4096 ..
drwxr-xr-x    2 0 0    49152 lost+found
drwxr-xr-x   73 0 0     4096 etc
drwxr-xr-x    2 0 0     4096 media
drwxr-xr-x   13 0 0     4096 var
drwxr-xr-x   12 0 0     4096 usr
drwxr-xr-x    2 0 0     4096 bin
drwxr-xr-x    2 0 0     4096 boot
drwxr-xr-x    7 0 0    24576 dev
drwxrwxr-x    5 0 50    4096 home
drwxr-xr-x    9 0 0     4096 lib
drwxr-xr-x    2 0 0     4096 mnt
drwxr-xr-x    2 0 0     4096 proc
drwxr-xr-x    5 0 0     4096 root
drwxr-xr-x    2 0 0     4096 sbin
drwxrwxrwx    4 0 0     4096 tmp
drwxr-xr-x    2 0 0     4096 sys
drwxr-xr-x    2 0 0     4096 srv
drwxr-xr-x    2 0 0     4096 opt
>
Name
lsfs — List available filesystems
Synopsis
lsfs [-p, --partitions] [-v, --verbose] [-h, --help]
Options
-p, --partitionsShow all partition information.
-v, --verboseMore verbose output.
-h, --helpDisplay short helptext and exit.
Description
This command lists available filesystems.
Example 58. Using the lsfs command
This shows the lsfs command displaying all the filesystem devices which can be used to read data from. The aliases with a filesystem specifier have been recognised and can be navigated with the other filesystem commands.
>lsfs
(hd0) alias for ((hdc1):ext2)
(nvram0) alias for (24cxx0p1)
(flash1) alias for ((nand0p2):jffs2)
(flash0) alias for (nand0p1)
>lsfs -v
(hd0) alias for ((hdc1):ext2)
(nvram0) alias for (24cxx0p1)
(flash1) alias for ((nand0p2):jffs2)
(flash0) alias for (nand0p1)
((hdc1):ext2)
(nor0)
(hdc1)
(hdc)
(tftpboot)
(xmodem)
(console)
(char4)
(char3)
(char2)
(char1)
(char0)
(24cxx0p1)
(24cxx0)
(nand0p2)
(nand0p1)
(nand0)
(s3c2410x)
>lsfs -p
((hdc1):ext2)
(nor0) dev e03be754, start 0x00000000, size 0x00200000 blksz 0x0001
(hdc1) dev e03bec74, start 0x0000003f, size 0x007a90b5 blksz 0x0200
(hdc) dev e03bec74, start 0x00000000, size 0x7ffffffe blksz 0x0200
(tftpboot)
(xmodem)
(console)
(char4) char4 character device
(char3) char3 character device
(char2) char2 character device
(char1) char1 character device
(char0) char0 character device
(24cxx0p1) dev e03c2f14, start 0x00000008, size 0x000001f8 blksz 0x0001
(24cxx0) dev e03c2f14, start 0x00000000, size 0x00000400 blksz 0x0001
(nand0p2) dev e03c44b4, start 0x00000020, size 0x00001fe0 blksz 0x0200
(nand0p1) dev e03c44b4, start 0x00000000, size 0x00000020 blksz 0x0200
(nand0) dev e03c44b4, start 0x00000000, size 0x04000000 blksz 0x0200
(s3c2410x) s3c2410x character device
>
Name
pwd — Show present working directory
Synopsis
pwd
Description
This command can be used to show the present working
directory. This information is also available in the
PWD shell variable.
Example 59. Using the pwd command and
PWD variable to show the present
working directory
>cd (hd0)/boot
>pwd
(hd0)/boot
>echo $PWD
(hd0)/boot
>cd ../var
>pwd
(hd0)/var
>
These are the commands to manipulate files and are available from the shell command line of ABLE from version 2.20 and later.
Name
cat — Displays contents of a text file
Synopsis
cat {filename}
Description
Use to display the contents of a file. The file will be displayed in ASCII text, non printable characters and escape sequences may cause various effects. This is usually only an issue if binary files are displayed.
Example 60. Using cat command to display files contents
This example shows the display of two files one text and one binary.
>cat (hd0)/etc/passwd
root:x:0:0:root:/root:/bin/bash
daemon:x:1:1:daemon:/usr/sbin:/bin/sh
bin:x:2:2:bin:/bin:/bin/sh
sys:x:3:3:sys:/dev:/bin/sh
sync:x:4:65534:sync:/bin:/bin/sync
>
This shows the display of part of a binary file and the undesirable effects.
>cat (hd0)/bin/ls
fb..p@VaeM`mLXkZ/.([=+$P*.nqBo      NU^.......!.,.&.>.AI)04RD"
<8 \ WQ J]:G9$..4 .(..44.4.....oo.o........b..b.... . . .P.U..... .. .. .bb...Hl
K ;[.T.  |.*.P. *.+., I|.  ....< i..
. ....8. +...` ...   . nye...  1.U&. nyy....  ...+ ..a.( 2.... c.u., i.0 >. . ..
|....w...4..?.o.....1.p..aP#......T#........e..4..`.e.a.H>.0.U&..nyR.i....i.0...
T.U.o.e.....o. ....H....o.`.H.h. ..ny<.U&..ny......m.A.0..i...L...t..
.0....$...$.....0...k<....g.H.d.n.T.D..&.`.
..
.l.8.x.T.......o...P..
...
..... . ..... .P#..nya....P.U&..nyb......b.a..~.a. .......Uu....u. .x..H.w. ....
P.. .\.0 ..".   ....  1.+.  K.\#..  a...
...".  A". 8+". >I". .". AP#. %T#. &X#. o\#. A. . .u . .!. ..!. !. __#+ _+ o+ .
$!. (!. ,!...0!...4!...8!...<!...@!...D!..H!...L!..P!..!...X!...\!...`!...d!.."R
"..S."..T."..U"..V."..X "..Z$"..[("..\,"..]0"..^4".._8"..`<"..a@"..bD"..cH"..d.aName
dumpfile — Displays a file in a hexadecimal dump
Synopsis
dumpfile {filename} [-s, --start {offset}] [-l, --length {length}] [-b, --blksize {size}] [-t, --text] [--help]
Options
filenameFile to dump
-s, --startoffsetOffset, in bytes, into the file to start the dump
-l, --lengthlengthLength of data, in bytes, to dump
-b, --blksizesizeBlock size
-t, --textDump text only, no hex output
--helpDisplay short helptext and exit
Description
Use to display the contents of a file in a hexadecimal dump. The output will be put through a pager and can be aborted with q.
Care should be taken with the parameters to this command which come after the filename.
Example 61. Using the dumpfile command
This example shows the dumpfile command being used in text only mode to show the first 300 bytes of a file.
>dumpfile (hd0)/etc/services -t -l 300
dump: (hd0)/etc/services is 17571 bytes long, dumping 0 to 300
00000000: # Network services, Internet style.#.# Note that it is presently
00000040:  the policy of IANA to assign a single well-known.# port number
00000080: for both TCP and UDP; hence, officially ports have two entries.#
000000c0:  even if the protocol doesn't support UDP operations..#.# Update
00000100: d from http://www.iana.org/assignments/port-numbers and other.#
>
This shows the file dump of the same file with hex output and starting with a hundred byte offset into the file.
>dumpfile (hd0)/etc/services -s 100
dump: (hd0)/etc/services is 17571 bytes long, dumping 100 to 17571
00000064: 7720656c 2d6c6c65 776f6e6b 20230a6e : le well-known.#
00000074: 74726f70 6d756e20 20726562 20726f66 : port number for
00000084: 68746f62 50435420 646e6120 50445520 : both TCP and UDP
00000094: 6568203b 2c65636e 66666f20 61696369 : ; hence, officia
000000a4: 20796c6c 74726f70 61682073 74206576 : lly ports have t
000000b4: 65206f77 6972746e 230a7365 65766520 : wo entries.# eve
000000c4: 6669206e 65687420 6f727020 6f636f74 : n if the protoco
000000d4: 6f64206c 276e7365 75732074 726f7070 : l doesn't suppor
000000e4: 44552074 706f2050 74617265 736e6f69 : t UDP operations
000000f4: 0a230a2e 70552023 65746164 72662064 : ..#.# Updated fr
00000104: 68206d6f 3a707474 77772f2f 61692e77 : om http://www.ia
00000114: 6f2e616e 612f6772 67697373 6e656d6e : na.org/assignmen
00000124: 702f7374 2d74726f 626d756e 20737265 : ts/port-numbers
00000134: 20646e61 6568746f 20230a72 72756f73 : and other.# sour
00000144: 20736563 656b696c 74746820 2f2f3a70 : ces like http://
00000154: 2e777777 65657266 2e647362 2f67726f : www.freebsd.org/
00000164: 2f696763 77737663 632e6265 732f6967 : cgi/cvsweb.cgi/s
00000174: 652f6372 732f6374 69767265 20736563 : rc/etc/services
00000184: 20230a2e 2077654e 74726f70 69772073 : ..# New ports wi
00000194: 62206c6c 64612065 20646564 72206e6f : ll be added on r
--MORE--
>
Name
file — Tests each argument in an attempt to classify it.
Synopsis
file [-i, --mime] [--help] [--version] filename...
Options
-i, --mimeCauses the file command to output mime type strings rather than the more traditional human readable ones.
--helpDisplay short helptext and exit
--versionDisplay commands version and exit
filenameName of file to checksum
Description
The file command examines a given file and tries to determine the files type. The underlying detection code is the same as that used by ABLE when determining how to load and execute files, this is useful if the user wishes to check ABLE is correctly determining a files type. Section 6.6, “How ABLE identifies files.” has more information on the detection method.
Example 62. Using the file command to determine filetypes
>file (hd0)/boot/vmlinuz-2.6.13-simtec1
(hd0)/boot/vmlinuz-2.6.13-simtec1: Linux Kernel
>file (tftpboot)test.sh
(tftpboot)test.sh: shell
>file (tftpboot)srec
(tftpboot)srec: Motorola S Record
>file (hd0)/etc/services
(hd0)/etc/services: data
>file (hd0)/bin/ls (hd0)/etc/services (hd0)/boot/vmlinuz-2.6.13-simtec1
(hd0)/bin/ls: elf
(hd0)/etc/services: ASCII text
(hd0)/boot/vmlinuz-2.6.13-simtec1: Linux Kernel
>file -i (hd0)/bin/ls (hd0)/etc/services (hd0)/boot/vmlinuz-2.6.13-simtec1
(hd0)/bin/ls: application/x-executable
(hd0)/etc/services: text/plain
(hd0)/boot/vmlinuz-2.6.13-simtec1: application/octet-stream
>
Name
sum — Checksum a file
Synopsis
sum {filename}
Description
Checksum a file, the value produced is the same as the sum command under UNIX®. This allows for files to be verified before loading with ABLE.
Example 63. Checksumming a file with the sum command
>sum (tftpboot)s3c2410-romwrite-220.bin
..........................................................
........................................
crc = 32182, 417 Kb processed,  (tftpboot)s3c2410-romwrite-220.bin
>
These are the commands to manipulate non-volatile memory entries and are available from the shell command line of ABLE from version 1.55 and later.
Name
nvclear — Reset non-volatile settings to defaults
Synopsis
nvclear
Description
This command wipes the nvvars stored in the hardware but does not update the values in memory. This allows the in memory values to be saved with the nvsave command.
Warning
A common mistake when using this command is to assume the nvsave command is required, this will simply result in the current in memory settings being retained, the additional nvsave command is not required.
Name
nvset — Set non-volatile parameters
Synopsis
nvset {variable} {value}
Description
Sets a non-volatile variable to a given value. The same
effect can be achieved by simply setting the shell variable
appropriately. The value is usually free form
text for general options, for boolean values the values
“on” and “off” are used (true/false and
0/1 may also be used)
Example 64. Using the nvset command and shell method to alter a non-volatile variables
>nvshow fb.enable
fb.enable  = on
>nvset fb.enable off
>nvshow fb.enable
fb.enable  = off
>fb.enable=on
>nvshow fb.enable
fb.enable  = on
>fb.enable=false
>nvshow fb.enable
fb.enable  = off
>nvset fb.enable true
>nvshow fb.enable
fb.enable  = on
>
Name
nvshow — Show non-volatile parameters
Synopsis
nvshow [variable]
Description
This command shows the current settings of the
non-volatile variables. If the variable is
omitted a complete list is shown, otherwise only the
specified variable is shown. Single non-volatile settings
are also available as variables in the shell, because a full
stop is ambiguous within a variable name the required
non-volatile setting must be placed within curly
braces.
Example 65. Using the nvshow command
>nvshow
hist (is unset)
boot.fs (is unset)
boot.auto  = off
boot.cmd  = (hd0)/boot/vmlinuz-2.6.13-simtec1 root=/dev/hdc1 console=ttySAC0,110
boot.timeout (is unset)
ide.multi-limit (is unset)
usb.hubdepth (is unset)
usb.enable (is unset)
console.level (is unset)
console.write (is unset)
console.read (is unset)
fb.enable  = on
fb.output (is unset)
fb.refresh (is unset)
fb.y (is unset)
fb.x (is unset)
sys.autoshadow (is unset)
sys.speed (is unset)
>nvshow fb.enable
fb.enable  = on
>echo ${fb.enable}
on
>These are the commands to start and manipulate loaded executable images entries and are available from the shell command line of ABLE from version 1.55 and later.
Name
boot — Starts loaded OS images
Synopsis
boot [--help] [--version]
Options
--helpDisplay short help message and exit
--versionDisplay the version of the boot command and exit
Description
This command starts execution of a previously loaded OS image. Its operation is fully described in Chapter 6, Starting an Operating System Manually. The arguments passed to the image are set with the setargs command.
Example 66. Using the boot command
>boot
boot: an image must be loaded with the load command first
>load (tftpboot)batty
tftp: attempting bootp
bootp: sending request
bootp: serverip: 192.168.7.1
bootp: netmask: 255.255.255.0
bootp: serverip: 192.168.7.1
bootp: netmask: 255.255.255.0
bootp: address: 192.168.7.29
>boot
Simtec Board Test Tool, Version 0.23
(c) 2005 Simtec Electronics

EB2410ITX (BAST) Test Suite
...
Name
load — Load executable images
Synopsis
load {file...}
Description
This command is used to load OS files which can be started using the boot command. The way a file is loaded is determined by the files type. The file type is found using the internal detection code. The type of a file may be examined using the file command.
The Chapter 6, Starting an Operating System Manually provides a complete description of this commands operation.
Name
showargs — Shows arguments to be passed to any booted OS
Synopsis
showargs
Name
setargs — Sets arguments to be passed to an OS started with the boot command
Synopsis
setargs {arguments...}
Description
Sets arguments to be passed to an OS started with the boot command.
Example 68. Using the setargs command
>showargs BOOTARGS=root=/dev/hda3 >setargs root=/dev/hdc1 console=ttySAC0,115200 >showargs BOOTARGS='root=/dev/hdc1 console=ttySAC0,115200' >
These are commands used to debug issues with ABLE and manipulating specific system functions. Some of these commands may not be available in all configurations and platforms.
Table of Contents
- bast-at — Perform an audio test.
- bast-at2 — Perform BAST audio test copies the line in to the line out
- bast-hdlcd — Manipulate an HD44780 attached to the EB2410ITX LCD Module port.
- dmcfg-rd — Debug command to read Davicom EEPROM
- dmcfg-wr — Debug command to write Davicom EEPROM
- dump — Displays an area of memory in hex dump
- memset — Set range of memory to a specific value.
- peek — Examine memory location
- pic-rd — Read a value to the PMU PIC
- pic-wr — Write a value to the PMU PIC
- poke — Poke memory location
- tick — Check system timing.
- vtp1 — Video test pattern
- vtp2 — Video test pattern
- vtp3 — Video test pattern
- vtp4 — Video test pattern
- vtp5 — Video test pattern
Name
bast-hdlcd — Manipulate an HD44780 attached to the EB2410ITX LCD Module port.
Synopsis
bast-hdlcd [-i] [-l {lines}] [-w {width}] [-m {msg}] [-f {font}] [-c {cursor}] [-z] [-h] [text...]
Name
dump — Displays an area of memory in hex dump
Synopsis
dump {start} [end]
Options
startMemory address to dump from in hex. Address is in logical memory space.
endLast memory address to dump in hex. Address is in logical memory space.
Description
Use to display the contents of a memory area in a hex dump. The output will be put through a pager and can be aborted with q.
Example 69. Using the dump command to examine memory
This example shows the dump command being used to display the first 4KB of memory. The output is aborted with q after the first page.
>dump 0 1000
00000000: e59ff034 e59ff014 e59ff014 e59ff014 : 4...............
00000010: e59ff014 e59ff014 e59ff014 e59ff014 : ................
00000020: f004458c f00410fc f00444d4 f004441c : .E.......D...D..
00000030: 00000000 f004464c 00000000 f0004008 : ....LF.......@..
00000040: ffffffff ffff7fff ffffffff ffffffff : ................
00000050: ffffffff ffffffff ffffffff ffffffff : ................
00000060: ffdfffff ffffffff ffffffff ffffffff : ................
00000070: dfffffff ffffffff ffffffbf ffffffff : ................
00000080: 7fffffff ffffffff ffffffff ffffffff : ................
00000090: ffffffff ffffffff ffffffff dfffffff : ................
000000a0: ffffffdf ffffffff dfffffff ffffffff : ................
000000b0: ffffffff ffffffff ffffffff ffffffff : ................
000000c0: ffffffff ffffffff ffffffff ffffffff : ................
000000d0: ffffffff fff7ffff ffffffff 7fffffff : ................
000000e0: ffffffff ffffffff ffffffff ffffffff : ................
000000f0: ffffffff ffffffff ffffffff ffffffdf : ................
00000100: ffffffff ffffffff ffffffff ffffffff : ................
00000110: ffffffff ffffffff ffffffff ffffffff : ................
00000120: ffffffff ffffdfff ffffffff ffffffff : ................
00000130: ffffffff ffffffff ffffffff ffffffff : ................
--MORE--
>
Name
memset — Set range of memory to a specific value.
Synopsis
memset {address} {length} [value]
Options
addressStart address of memory to set in hex
lengthLength of area to set in hex
valueValue to set memory region to in hex (defaults to 0 if unspecified)
Name
peek — Examine memory location
Synopsis
peek [[p] | [v]] [[b] | [h] | [w]] [rpt {count}] [--help] [--version] {address}
Options
pInterpret address as physical.
vInterpret address as virtual (the default if not specified).
bByte (8bit) wide read.
hHalf word (16bit) wide read.
wWord (32bit) wide read (default if not specified).
rptcountRepeats the read
countaddressMemory address to read in hexadecimal.
Description
This command retrieves a memory location and prints it in hexadecimal. The address specified is dependant on the machine architecture and is the translated by the MMU.
The p option causes the physical address
specified to be translated into a virtual address suitable for
use within ABLE, the virtual translated
address is shown during display.
Name
poke — Poke memory location
Synopsis
poke [[p] | [v]] [[b] | [h] | [w]] [[eor] | [orr] | [bic] | [set]] [rpt {count}] {address} {value}
Options
pInterpret memory address as physical location.
vInterpret address as virtual (the default if not specified).
bByte (8bit) wide read.
hHalf word (16bit) wide read.
wWord (32bit) wide read (default if not specified).
eorExclusive or the
valueorrOr the
valuewith the current contents of memory.bicClear the bits of the memory location which are set in
value.setAlter the memory to the
value.rptcountRepeats the read
countaddressMemory address to read in hexadecimal.
valueValue to set in hexadecimal.
Description
This command alters a memory location to the specified value. The address specified is dependant on the machine architecture and is the translated by the MMU.
The p option causes the physical address
specified to be translated into a virtual address suitable for
use within ABLE, the virtual translated
address is shown.
Name
vtp1 — Video test pattern
Synopsis
vtp1
Description
Video test pattern, filling the whole of the screen with the following pattern. Left hand side 8 pixel vertical red bar. Right hand side with 8 pixel green bar. The rest of the screen is an stipple pattern of white and black single pixels.
This command will not be available if the frame buffer is disabled.

Name
vtp2 — Video test pattern
Synopsis
vtp2
Description
Video test pattern, filling the whole of the screen with the following pattern. Left hand side 8 pixel vertical red bar. Right hand side with 8 pixel green bar. The rest of the screen is an alternating 8x8 white and black block pattern
This command will not be available if the frame buffer is disabled.

Name
vtp3 — Video test pattern
Synopsis
vtp3

Name
vtp4 — Video test pattern
Synopsis
vtp4

Name
vtp5 — Video test pattern
Synopsis
vtp5
Description
Video test pattern, filling the whole of the screen with the following pattern. Left hand side is a vertical blue bar, 8 pixels wide, with red single line at the top. The right hand side is green. The right hand side is a vertical green bar, 8 pixels wide, with a blue cap on the top line. The rest of the screen is an alternating 8x8 white and black block pattern
This command will not be available if the frame buffer is disabled.

Part III shows the available non-volatile variables.
These nvram variables are available and usable in ABLE version 2.20 or later. Any variables which are not available on all platforms will be marked as such in their description section.
Each variable is documented in a format similar to the UNIX® manual page layout. The page is separated into several parts:
| Name - The name of the variable and its purpose. |
| Description - Describes the variable in detail. |
| Platforms - This optional section describes the platforms which use the variable is present, if not present the variable is available on all platforms. |
| See also - This optional section gives references to other variables which may be relevant. |
Table 9. Alphabetical list of non-volatile variables
| Variable | Purpose |
|---|---|
| boot.auto | Enable auto boot |
| boot.cmd | Command line to use for auto boot |
| boot.timeout | Time to wait before auto boot |
| boot.fs | The filesystems to be scanned by the autoboot command. |
| console.write | Default Console output stream |
| console.read | Default Console input stream |
| console.level | Console logging level |
| fb.enable | Framebuffer driver - enable output |
| fb.output | Framebuffer driver - output target |
| fb.x | Framebuffer driver - Display X size (width) |
| fb.y | Framebuffer driver - Display Y size (height) |
| fb.refresh | Framebuffer driver - Display refresh frequency |
| ide.multi-limit | IDE multiple sector read limit |
| shell.hist | Shell history depth |
| sys.autoshadow | Whether able will automatically moved into RAM at system start |
| sys.speed | System speed set at start time |
| usb.enable | USB system enable |
| usb.hubdepth | USB system depth hubs should be searched for devices to |
Table of Contents
- boot.auto — Enable auto boot
- boot.cmd — Command line to use for auto boot
- boot.timeout — Time to wait before auto boot
- boot.fs — The filesystems to be scanned by the autoboot command.
- console.write — Default Console output stream
- console.read — Default Console input stream
- console.level — Console logging level
- fb.enable — Framebuffer driver - enable output
- fb.output — Framebuffer driver - output target
- fb.x — Framebuffer driver - Display X size (width)
- fb.y — Framebuffer driver - Display Y size (height)
- fb.refresh — Framebuffer driver - Display refresh frequency
- ide.multi-limit — IDE multiple sector read limit
- shell.hist — Shell history depth
- sys.autoshadow — Determines if ABLE will automatically moved into RAM at system start
- sys.speed — System speed set at start time
- usb.enable — USB system enable
- usb.hubdepth — USB system depth hubs should be searched for devices to
Name
boot.auto — Enable auto boot
Description
If this variable is unset the default action is the same as if it were set to true. The complete autoboot process is discussed in Chapter 7, Starting an Operating System Automatically.
Name
boot.cmd — Command line to use for auto boot
Description
This variable is used as a command line to be automatically executed when the boot.auto variable is set to true and the boot.timeout is set to non zero. If unset defaults to autoboot. The complete autoboot process is discussed in Chapter 7, Starting an Operating System Automatically.
Name
boot.timeout — Time to wait before auto boot
Description
This variable is used to configure the number of seconds to wait for the user to abort the auto boot sequence when the boot.auto variable is on. The complete autoboot process is discussed in Chapter 7, Starting an Operating System Automatically.
Name
boot.fs — The filesystems to be scanned by the autoboot command.
Description
This variable is used to configure the names and ordering of the filesystems to be automatically scanned by the autoboot command. If unset it defaults to "cd,hd,rom,tftpboot" e.g. try the CDROM, hard discs, NOR flash and then the network.
Name
console.write — Default Console output stream
Description
Determines where console output will be sent. See console.read for details on setting the read stream. Note the read and write sources do not have to be "balanced" and may be mixed as required e.g. write set to vga and read set to serial.
There are three console drivers available on every
platform, the null driver which
redirects all ABLE output nowhere so it is not seen, the
all-wr driver which sends all console
output to any console driver capable of displaying it and the
serial driver which sends output to the
console serial port (typically the first serial port on a
system).
Full details on controlling the console system can be found in Chapter 5, ABLE Console.
The default, where no nvram variable is set, on all
platforms since ABLE version 1.79 is the
all-wr target.
Warning
This Variable has been renamed in ABLE versions 2.20 and later. In previous versions the variable was was called "cons_write".Name
console.read — Default Console input stream
Description
Determines where console input will come from. See console.write for details on setting the write stream.
There are three console drivers available on every
platform, the null driver which
produces no input so no buttons can be pressed, the
all-rd driver which accepts input from
any console driver capable of producing it and the
serial driver which accepts input from
the console serial port (typically the first serial port on a
system).
The default, where no nvram variable is set, on all
platforms since ABLE version 1.79 is the
all-rd target.
Warning
This Variable has been renamed in ABLE versions 2.20 and later. In previous versions the variable was called "cons_read".Name
console.level — Console logging level
Description
Sets the default console logging level. This can be altered after boot with console command.
Name
fb.enable — Framebuffer driver - enable output
Name
fb.x — Framebuffer driver - Display X size (width)
Description
This determines how many pixels wide the video display console will be. See fb.y for the y resolution.
Name
fb.y — Framebuffer driver - Display Y size (height)
Description
This determines how many pixels high the video display console will be. See fb.x for the x resolution.
Name
ide.multi-limit — IDE multiple sector read limit
Description
If set, the value is used to limit the number of sectors read from an IDE drive in a single operation. With most drives this can be left unset. Some drives have firmware which incorrectly report the number of sectors they can transfer (Quantum Fireball TM series seem especially susceptible). This parameter allows the user to force ABLE to read a smaller number of sectors than the drives reported capability. The smaller of this parameter and the drives reported maximum number of sectors is used.
Name
shell.hist — Shell history depth
Description
How many commands to remember in the shell history. The shell is the ABLE module which provides the command line. The command line editor can remember several previous commands accessed by using the up arrow. This variable controls how many previous commands are remembered. The Chapter 3, Command Line Interface covers the use of ABLE shell in more detail.
Name
sys.autoshadow — Determines if ABLE will automatically moved into RAM at system start
Description
Set to on to shadow ABLE into memory at start time. See the shadow command for more details. If this is unset, then the value will be determined by the amount of memory available, if more than 32Mbyte of memory is fitted the shadow will be performed. This parameter is only available on platforms where ABLE can be directly executed from flash.
Name
sys.speed — System speed set at start time
Table of Contents
| Revision History | ||||||||||
|---|---|---|---|---|---|---|---|---|---|---|
| Revision 1.00 | 24th January 2003 | VRS | ||||||||
| Initial Release. | ||||||||||
| Revision 1.40 | 3rd February 2003 | VRS | ||||||||
| Updates to non volatile commands, addition of version command. | ||||||||||
| Revision 1.55 | 25th April | VRS | ||||||||
| ||||||||||
| Revision 1.73 | 17th September | VRS | ||||||||
| ||||||||||
| Revision 1.80 | 18th November | VRS | ||||||||
| ||||||||||
| Revision 1.82 | 27th November | VRS | ||||||||
| ||||||||||
| Revision 1.95 | 10th March 2004 | VRS | ||||||||
| ||||||||||
| Revision 1.99 | 2nd August 2004 | VRS | ||||||||
| ||||||||||
| Revision 2.01 | 11th October 2004 | VRS | ||||||||
| ||||||||||
| Revision 2.08 | 13th April 2005 | VRS | ||||||||
| Revision 2.20 | 17th January 2006 | VRS | ||||||||
|
The ABLE 2.20 release is a significant milestone release which represents a greater expansion in capabilities than many previous releases.
| ||||||||||
| Revision 2.21 | 23rd February 2006 | VRS | ||||||||
| ||||||||||
| Revision 2.22 | 21st March 2006 | VRS | ||||||||
| ||||||||||
| Revision 2.23 | 30th April 2006 | VRS | ||||||||
| ||||||||||
| Revision 2.24 | 3rd June 2006 | VRS | ||||||||
|
This version is the first edition of the printed book.
| ||||||||||
A
- ABLE executable, ABLE executable, Upgrading
- Advanced Technology Attachment (see ATA)
- Advanced Technology Attachment Packet Interface (see ATAPI)
- AOUT, ELF and AOUT files
- ATA (Advanced Technology Attachment), Data sources
- ATAPI (Advanced Technology Attachment Packet Interface), Data sources
B
- batty, ABLE executable
- BIOS, Overview
C
- command
- autoboot, autoboot
- bast-at, bast-at
- bast-at2, bast-at2
- bast-hdlcd, bast-hdlcd
- boot, The "setargs, load and boot" method, boot
- cat, Images, text and data files, cat
- cd, Filesystem navigation, Navigating a filesystem, cd
- console, Console drivers, Configuring the console system, Setting the logging level, console
- cp, cp
- date, date
- devls, devls
- display, Images, text and data files, display
- dmcfg-rd, dmcfg-rd
- dmcfg-wr, dmcfg-wr
- dump, dump
- dumpfile, Images, text and data files, dumpfile
- echo, echo
- exit, exit
- file, Filesystem navigation, Navigating a filesystem, How ABLE identifies files., file
- help, ABLE help system, help
- history, history
- hwinfo, Using the network to obtain files, hwinfo
- ifconfig, Finding a network interface, ifconfig
- load, The "setargs, load and boot" method, load
- ls, Filesystem navigation, Navigating a filesystem, ls
- lsfs, Filesystem navigation, lsfs
- man, man
- meminfo, meminfo
- memset, memset
- mii, mii
- modules, modules
- nvclear, Setting Options, nvclear
- nvsave, Non volatile variables, Setting Options, nvsave
- nvset, Non volatile variables, Setting Options, nvset
- nvshow, Setting Options, nvshow
- nvunset, nvunset
- peek, peek
- pic-rd, pic-rd
- pic-wr, pic-wr
- pmu, pmu
- poke, poke
- pwd, Filesystem navigation, pwd
- read, read
- reset, reset
- sbcd, sbcd
- setargs, The "setargs, load and boot" method, setargs
- setdate, setdate
- setopt, Console drivers, setopt
- settime, settime
- sh, sh
- shadow, shadow
- showargs, showargs
- showhz, showhz
- sleep, sleep
- sum, sum
- sysmsg, Setting the logging level, sysmsg
- sysspeed, sysspeed
- tasks, tasks
- test, Conditional execution, Shell script, test
- tick, tick
- uname, ABLE help system, uname
- version, version
- vtp1, vtp1
- vtp2, vtp2
- vtp3, vtp3
- vtp4, vtp4
- vtp5, vtp5
- wrout, wrout
- command line interface, Overview, Command Line Interface
- conditionals, Conditional execution
- editing, Command line editing
- filesystem, Filesystem navigation
- help, ABLE help system
- quoting, Quoting
- variables, Shell variables
- accessing, Accessing variables
- non-volatile (see non-volatile variables)
- positional, Positional variables, Accessing variables
- simple, Simple variables
- special, Special variables
- special meaning, Variables with special meanings
- Compress file, UNIX® Compress files
- console, Getting Started
D
- DHCP (Dynamic Host Configuration Protocol), Network sources, Networking, Configuring a network interface, Using the network to obtain files, ifconfig
E
- ELF, ELF and AOUT files
- EXT2, Alias sources
F
- FAT, Alias sources
- FFS, Alias sources
G
- Gzip file, Gzip files
H
- Hyperterm, Using hyperterm as a serial console
I
- IDE (see ATA)
- Integrated Drive Electronics (see ATA)
- Internet Protocol (see IP)
- IP (Internet Protocol), Networking, ifconfig
- ISO9660, Alias sources
L
- Linux, ELF and AOUT files
M
- Minicom, Using minicom as a serial console
- modular system, Overview
- modules, Overview, Getting Started
N
- NetBSD, ELF and AOUT files
- non-volatile variables, Non volatile variables
- boot, Getting Started
- auto, boot.auto
- cmd, No console at all, Displaying a logo and boot abort, boot.cmd
- fs, boot.fs
- timeout, boot.timeout
- console
- fb
- enable, fb.enable
- output, fb.output
- refresh, fb.refresh
- x, fb.x
- y, fb.y
- ide
- multi-limit, ide.multi-limit
- shell
- hist, shell.hist
- sys
- autoshadow, sys.autoshadow
- speed, sys.speed
- usb
- enable, usb.enable
- hubdepth, usb.hubdepth
O
- OpenBSD, ELF and AOUT files
- operating system, Overview, Starting an Operating System Manually
P
- PCI, Networking
- PPP (Point to Point Protocol), Networking
R
- reset, Running the upgrade, reset
- hard, Getting Started
- romwrite, ABLE executable, Upgrading, Running the upgrade
S
- S-Record, Motorola S-Record
- Shell script, Shell script, ABLE shell script
- SLIP (Serial Line Internet Protocol), Networking
T
- TFTP (Trivial File Transfer Protocol), Network sources, Networking, Configuring a network interface, Using the network to obtain files, Loading the Upgrade
U
- UDP (User Datagram Protocol), Networking
- Universal Serial Bus (see USB)
- USB (Universal Serial Bus), Getting Started, Console drivers, Data sources
- User Datagram Protocol (see UDP)
X
- XModem, XModem source, Networking
Z
- zImage, How ABLE identifies files.
Colophon
This Document was prepared in Docbook XML using the GNU emacs text editor. The source was combined with DocBook XSL Stylesheets using an XSLT processor to produce output in various formats.
For web output the Saxon XSLT processor was used to convert the docbook XML directly to HTML.
For print output the Saxon XSLT processor was used to convert the docbook XML to Formatting Objects (FO) XML.
For general print documents the FO XML is converted to PDF and Postscript with the Apache project FOP utility.
For six by nine inch book output the Render X XEP digital typography tool was used to convert the FO XML to print ready PDF output.
The cover designs were developed in the GNU Image Manipulation Program (GIMP).
Simtec Electronics
Copyright © 2003 Simtec Electronics
| Revision History | ||
|---|---|---|
| Revision 1.00 | 16th January 2004 | VRS |
|
Initial Release. | ||
| Revision 1.01 | 15th April 2005 | VRS |
|
Fix formatting errors. | ||
Table of Contents
List of Examples
- 2.1. Starting ABLE FIS from the command line
- 2.2. ABLE FIS creating a default FIS table
- 2.3. Removing a partition from a FIS table
- 2.4. Adding and Editing a FIS table partition
- 2.5. Adding partition to FIS table
- 2.6. Shortening a FIS table
- 2.7. Writing current FIS partition table
- 2.8. Editing the name of a FIS partition
- 2.9. Changing the length of a partition.
The Simtec Electronics Advanced Boot Load Environment (ABLE) supports the use of Flash Information Services (FIS) partitions placed in the boot Flash on some Simtec Electronics development boards. This allows for an Operating System to be booted without any other boot device attached to the system.
The ABLE FIS tool allows the user to manipulate these FIS tables and arrange the flash in any way they choose.
Warning
The ABLE boot loader partition must never be removed or altered. Moving or altering this partition will corrupt the boot loader and the system will no longer start (see Simtec Electronics website for details on recovering such systems).
Table of Contents
The latest version is usually available either from the ABLE support page or the specific board support page on the Simtec Electronics website.
The FIS tool is usually executed from the ABLE command line.
Example 2.1. Starting ABLE FIS from the command line
>(tftpboot)ablefis
tftp: attempting bootp
bootp: sending request
bootp: sending request
using TFTP
using TFTP
.using TFTP
....loaded (tftpboot)ablefis, 0x80ec bytes at 0x00008000
boot: booting 'able app1'
ABLE RedBoot FIS Partition Tool, V0.20
(c) 2003 Simtec Electronics

Machine is BAST
Flash: SST 39LF160 [0x00BF, 0x2782]
read valid RedBoot FIS table
Partitions (3 of 16):
 00: 0x00000000 -> 00080000: ABLE
 01: 0x00000000 -> 00000000: Partition Marker
 02: 0x00080000 -> 001ff000: Namedspace

Free space:

commands:
         p - print current table
         d - delete partition
         e - edit partition
         x - extend table (add new partititon)
         s - shorten table (remove last partition)
         w - write table to flash
         q - quit
main>
When executed the ABLE FIS tool prints its introduction banner including its version number.
ABLE RedBoot FIS Partition Tool, V0.20
(c) 2003 Simtec Electronics
This is followed by a brief summary of the flash device in use and the system name.
Machine is BAST
Flash: SST 39LF160 [0x00BF, 0x2782]
The current FIS table is displayed showing the partition numbers, sizes and any free space.
Partitions (3 of 16):
 00: 0x00000000 -> 00080000: ABLE
 01: 0x00000000 -> 00000000: Partition Marker
 02: 0x00080000 -> 001ff000: Namedspace

Free space:
Finally a brief list of possible commands is shown followed by the command prompt.
commands:
         p - print current table
         d - delete partition
         e - edit partition
         x - extend table (add new partititon)
         s - shorten table (remove last partition)
         w - write table to flash
         q - quit
main>
The command prompt shows which menu is currently active within the tool and allows easy navigation. If there is no valid FIS table already configured the tool will create a default.
Example 2.2. ABLE FIS creating a default FIS table
ABLE RedBoot FIS Partition Tool, V0.20
(c) 2003 Simtec Electronics

Machine is BAST
Flash: SST 39LF160 [0x00BF, 0x2782]
did not find valid RedBoot FIS table on device, creating new
Created default table
Partitions (2 of 16):
 00: 0x00000000 -> 00080000: ABLE
 01: 0x00000000 -> 00000000: Partition Marker

Free space:
  0x00080000 -> 0x001ff000 (0x0017f000 bytes)

commands:
         p - print current table
         d - delete partition
         e - edit partition
         x - extend table (add new partititon)
         s - shorten table (remove last partition)
         w - write table to flash
         q - quit
main>
Warning
It is essential to realise that the system will no longer boot if the ABLE partition is altered or written to.
The main menu
commands:
         p - print current table
         d - delete partition
         e - edit partition
         x - extend table (add new partititon)
         s - shorten table (remove last partition)
         w - write table to flash
         q - quit
is the root for all other operations.
This menu is indicated by its "main>" prompt. As on all menus the "h" will redisplay all the commands available.
The "q" command will quit the program and return to ABLE.
The "p" command will print the current table, this table will not be written to the flash device until the "w" command is used.
The "d" command will prompt for a partition number and remove it from the table, this command returns to the main menu.
Example 2.3. Removing a partition from a FIS table
main> p
Partitions (3 of 16):
 00: 0x00000000 -> 00080000: ABLE
 01: 0x00000000 -> 00000000: Partition Marker
 02: 0x00080000 -> 00080000: Unused 2

Free space:
  0x00080000 -> 0x001ff000 (0x0017f000 bytes)
main> d
Which partition to delete (0-2) ?2
free_space: could not find allocated area 0x00080000->0x00080000
Deleted entry
main> p
Partitions (3 of 16):
 00: 0x00000000 -> 00080000: ABLE
 01: 0x00000000 -> 00000000: Partition Marker
 02: 0x00000000 -> 00000000: Unused 2

Free space:
  0x00080000 -> 0x001ff000 (0x0017f000 bytes)
main>
The "e" command will prompt for a partition number to edit and change to the Section 2.2, “Edit Menu”
Example 2.4. Adding and Editing a FIS table partition
main> x
Adding partition 2
main> p
Partitions (3 of 16):
 00: 0x00000000 -> 00080000: ABLE
 01: 0x00000000 -> 00000000: Partition Marker
 02: 0x00080000 -> 00080000: Unused 2

Free space:
  0x00080000 -> 0x001ff000 (0x0017f000 bytes)
main> e
Which partition to edit (0-2) ?2
Partition 2:
         Name                 = Unused 2
         Flash Address        = 0x00080000
         Flash Length         = 0x00000000
         Data Execution Base  = 0x00000000
         Data Execution Entry = 0x00000000
         Data Length          = 0x00000000

Edit commands:

         n - edit name
         p - edit position in flash
         d - edit data-length
         b - edit execution base
         e - edit execution address
         r - return to main menu
         s - show parition information again
         h - print this help message
edit 2>
The "x" command will add a new partition in the next available numerical partition number.
Example 2.5. Adding partition to FIS table
main> p
Partitions (2 of 16):
 00: 0x00000000 -> 00080000: ABLE
 01: 0x00000000 -> 00000000: Partition Marker

Free space:
  0x00080000 -> 0x001ff000 (0x0017f000 bytes)
main> x
Adding partition 2
main> p
Partitions (3 of 16):
 00: 0x00000000 -> 00080000: ABLE
 01: 0x00000000 -> 00000000: Partition Marker
 02: 0x00080000 -> 00080000: Unused 2

Free space:
  0x00080000 -> 0x001ff000 (0x0017f000 bytes)
main>
The "s" command will remove the last partition in the table.
Example 2.6. Shortening a FIS table
main> p
Partitions (3 of 16):
 00: 0x00000000 -> 00080000: ABLE
 01: 0x00000000 -> 00000000: Partition Marker
 02: 0x00000000 -> 00000000: Unused 2

Free space:
  0x00080000 -> 0x001ff000 (0x0017f000 bytes)
main> s
free_space: could not find allocated area 0x00000000->0x00000000
main> p
Partitions (2 of 16):
 00: 0x00000000 -> 00080000: ABLE
 01: 0x00000000 -> 00000000: Partition Marker

Free space:
  0x00080000 -> 0x001ff000 (0x0017f000 bytes)
main>
The "w" will write the current partition table to the flash. ABLE will not re-read these changes until the system is reset.
Example 2.7. Writing current FIS partition table
main> w
Writing new FIS table to flash
Erasing device: . done
Writing data: . done
Verifying data: . done
Done. Changes will not take effect until next reset
main>
The edit menu
Edit commands:
         n - edit name
         p - edit position in flash
         d - edit data-length
         b - edit execution base
         e - edit execution address
         r - return to main menu
         s - show parition information again
         h - print this help message
allows for the manipulation of a specific FIS partition. The number after the "edit" prompt indicates which partition is being edited. The "h" command wil redisplay the available commands and the "q" command will return to the main menu.
The "n" command will edit the name of the partition up to a maximum length of 15 characters.
Example 2.8. Editing the name of a FIS partition
edit 2> s
Partition 2:
         Name                 = Unused 2
         Flash Address        = 0x00080000
         Flash Length         = 0x00000000
         Data Execution Base  = 0x00000000
         Data Execution Entry = 0x00000000
         Data Length          = 0x00000000

edit 2> n
Enter new name for parititon (max 15 characters): BootSpace
edit 2> s
Partition 2:
         Name                 = BootSpace
         Flash Address        = 0x00080000
         Flash Length         = 0x00000000
         Data Execution Base  = 0x00000000
         Data Execution Entry = 0x00000000
         Data Length          = 0x00000000

edit 2>
The "p" command changes the starting position and length of the partition within the flash.
Example 2.9. Changing the length of a partition.
edit 2> s
Partition 2:
         Name                 = BootSpace
         Flash Address        = 0x00080000
         Flash Length         = 0x00000000
         Data Execution Base  = 0x00000000
         Data Execution Entry = 0x00000000
         Data Length          = 0x00000000

edit 2> p
Free space:
  0x00080000 -> 0x001ff000 (0x0017f000 bytes)
Current position is 0x00080000 -> 00080000 (0 bytes)
New value for start position in flash (0x00080000) ?
New value for length in flash (0x00000000) ?17f000
edit 2> s
Partition 2:
         Name                 = BootSpace
         Flash Address        = 0x00080000
         Flash Length         = 0x0017f000
         Data Execution Base  = 0x00000000
         Data Execution Entry = 0x00000000
         Data Length          = 0x00000000

edit 2>
The "d" command changes the data length of the partition
The "b" command changes the data execution base of the partition
The "e" command changes the data execution address of the partition
The "s" command shows information on the partition being edited.
Simtec Electronics
Copyright © 2005 Simtec Electronics
| Revision History | ||
|---|---|---|
| Revision 0.18 | 15th April 2005 | VRS |
|
Initial Release. | ||
Table of Contents
List of Examples
The Simtec Electronics Advanced Boot Load Environment (ABLE) is a portable modular boot loader for use in applications where an OS must be retrieved and started. ABLE provides extended functionality providing modules for a command line, video consoles, serial consoles, network booting and numerous other facilities.
Batty is an ABLE tool which performs hardware unit tests. It runs on all platforms. The number and nature of its tests vary between platforms depending on factors such as availability of hardware and features preset. To be used effectively batty must be run on ABLE versions later than 2.05.
The latest version is usually available either from the ABLE support page or the specific board support page on the Simtec Electronics website.
The batty tool is executed from the ABLE command line and commences execution immediately.
Example 2.1. Starting batty from the command line
>(tftpboot)batty
.....loaded (tftpboot)batty, 0x8040 bytes at 0x00008000
boot: booting 'able app1'
Simtec Board Test Tool, Version 0.18
(c) 2005 Simtec Electronics

EB2410ITX (BAST) Test Suite

Testing S3C24XX CPU Core
 CPU ID 32410002, OK [S3C2410A]
 Testing internal SRAM block
  Pattern: all ones
  Pattern: all zeros
  Pattern: alternate zero/ones (LSB set)
  Pattern: alternate zero/ones (LSB unset)
  Writing address to each location

 Testing system RAM [0x00400000..0x07d00000]
  Pattern: all ones
  Pattern: all zeros
  Pattern: alternate zero/ones (LSB set)
  Pattern: alternate zero/ones (LSB unset)
  Writing address to each location

 Checking ABLE CRC
  CRC OK

 Searching for ABLE info
  Version 208
  Release 2005041001
  Supported machine number 3
  Supported machine number 6

Testing CPLD registers
 CPLD ID register (value 00) OK


DONE: 13 tests, 13 ok, 0 failed, 0 warnings
PASSED: all tests OK
>
Example 2.1, “Starting batty from the command line” shows a typical execution of batty on an EB2410ITX. On this particular platform a fairly small number of tests are performed, specifically a series of memory tests and a verification that the ABLE stored in flash is viable. The DONE line shows the number of tests attempted and the number passed along with any warnings.